How Does the New Shopify Integration Work?
Learn how Post Affiliate Pro's Shopify integration enables product-level tracking, vendor-specific commissions, and advanced affiliate program management for yo...
7 min read


Would you like to improve your affiliate software even more? Check out the Shopify integration for Post Affiliate Pro.
Be the first to know about new features and product updates.
A leading cloud-based, multichannel commerce platform designed for small and medium-sized businesses.
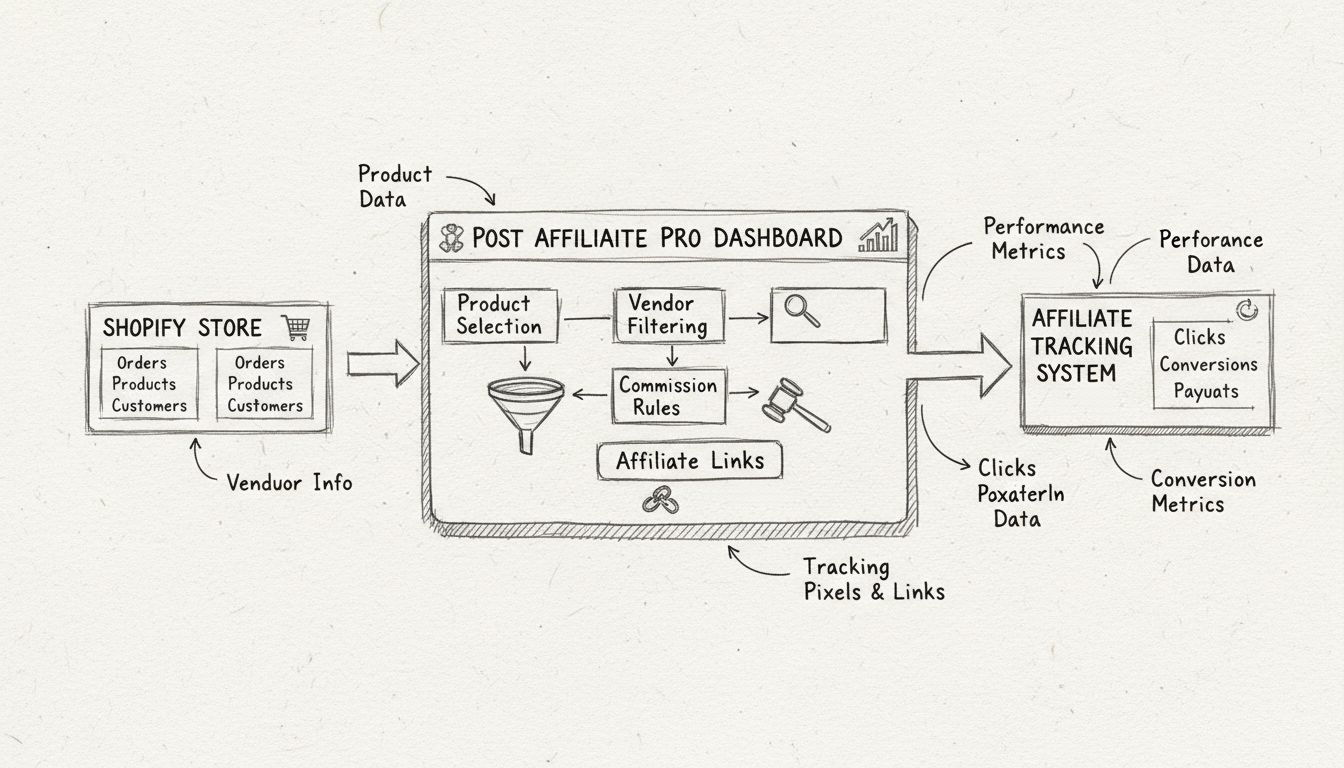
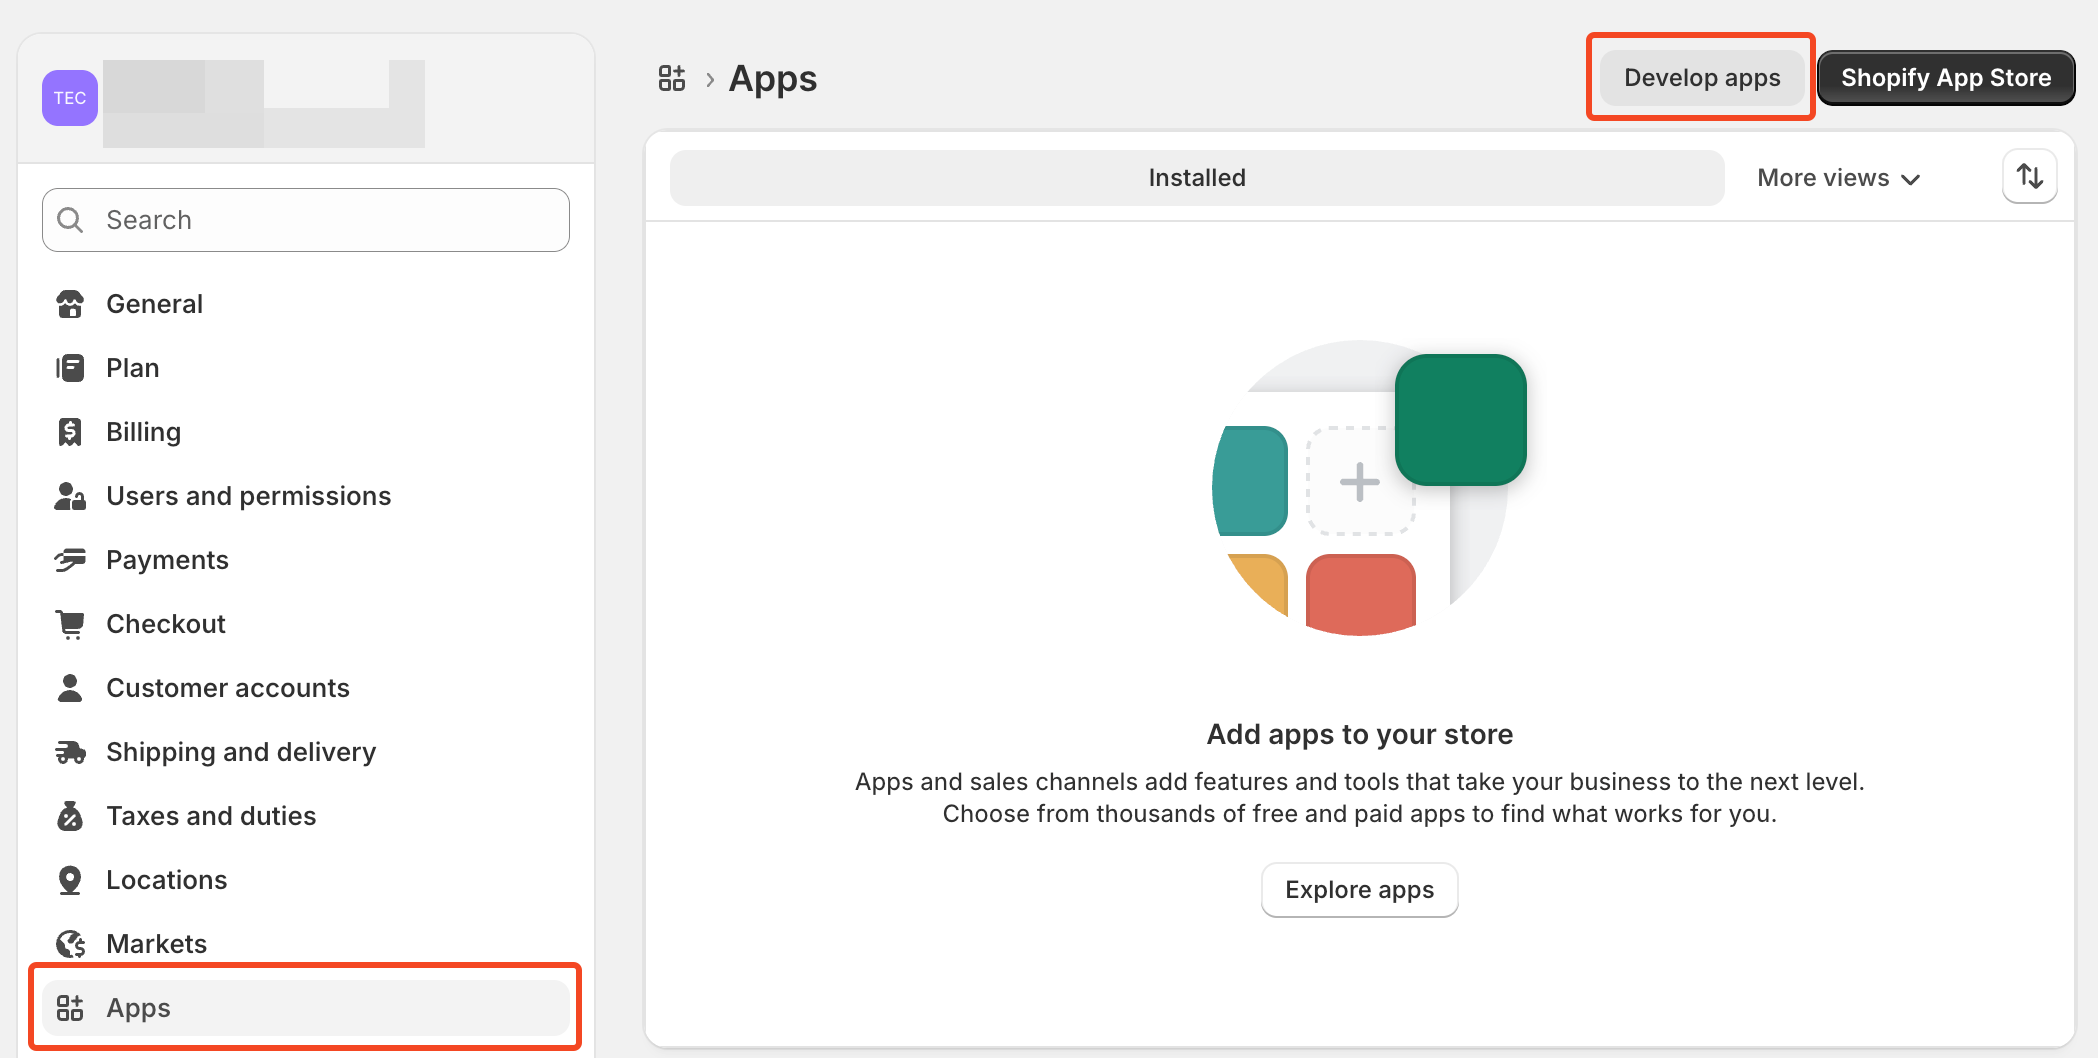
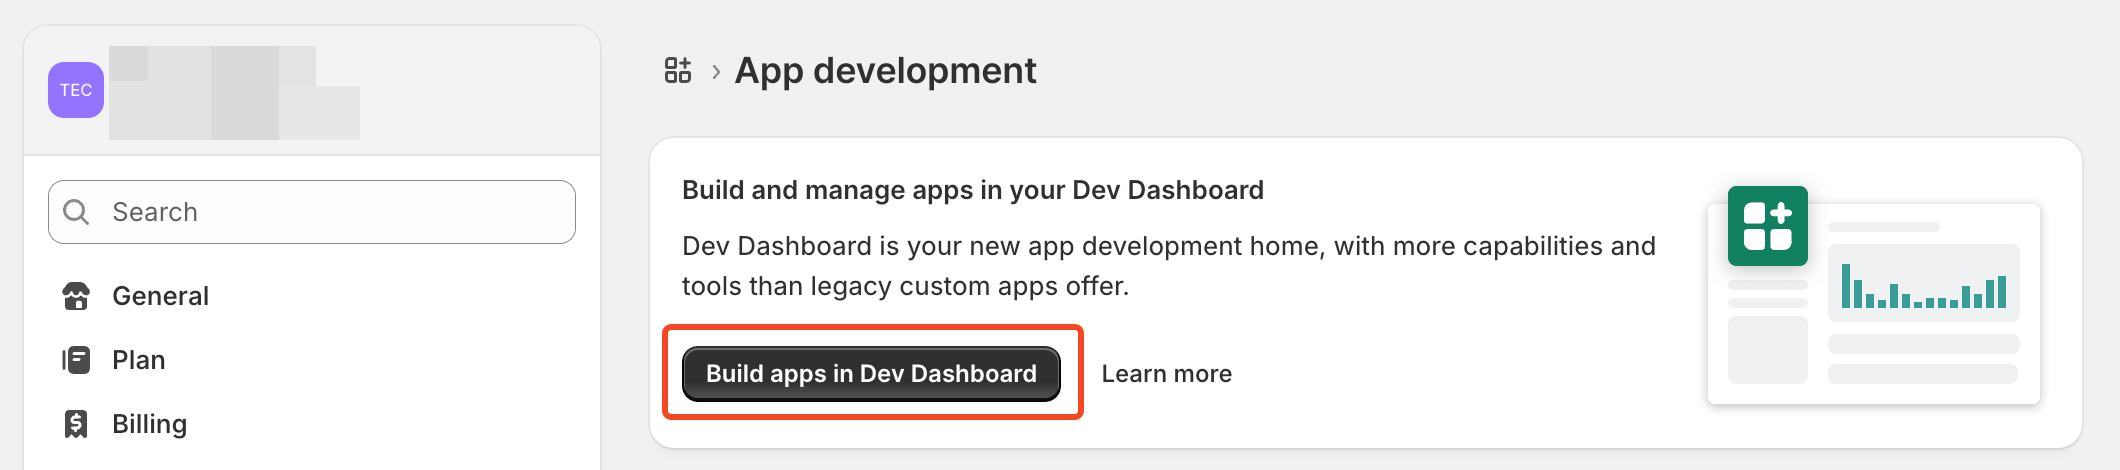
To integrate your Shopify store, you can use the official built-in plugin, but first, you need to create a custom app in your Shopify store.
In case you would like to create a dedicated staff account for our support to set this up for you, you need to create a staff account for us in your Shopify > Settings > Users with these permissions:
orders, customers, settings, app development, manage and install apps and channels.Or just select these two roles for the user: Administrator, App developer.

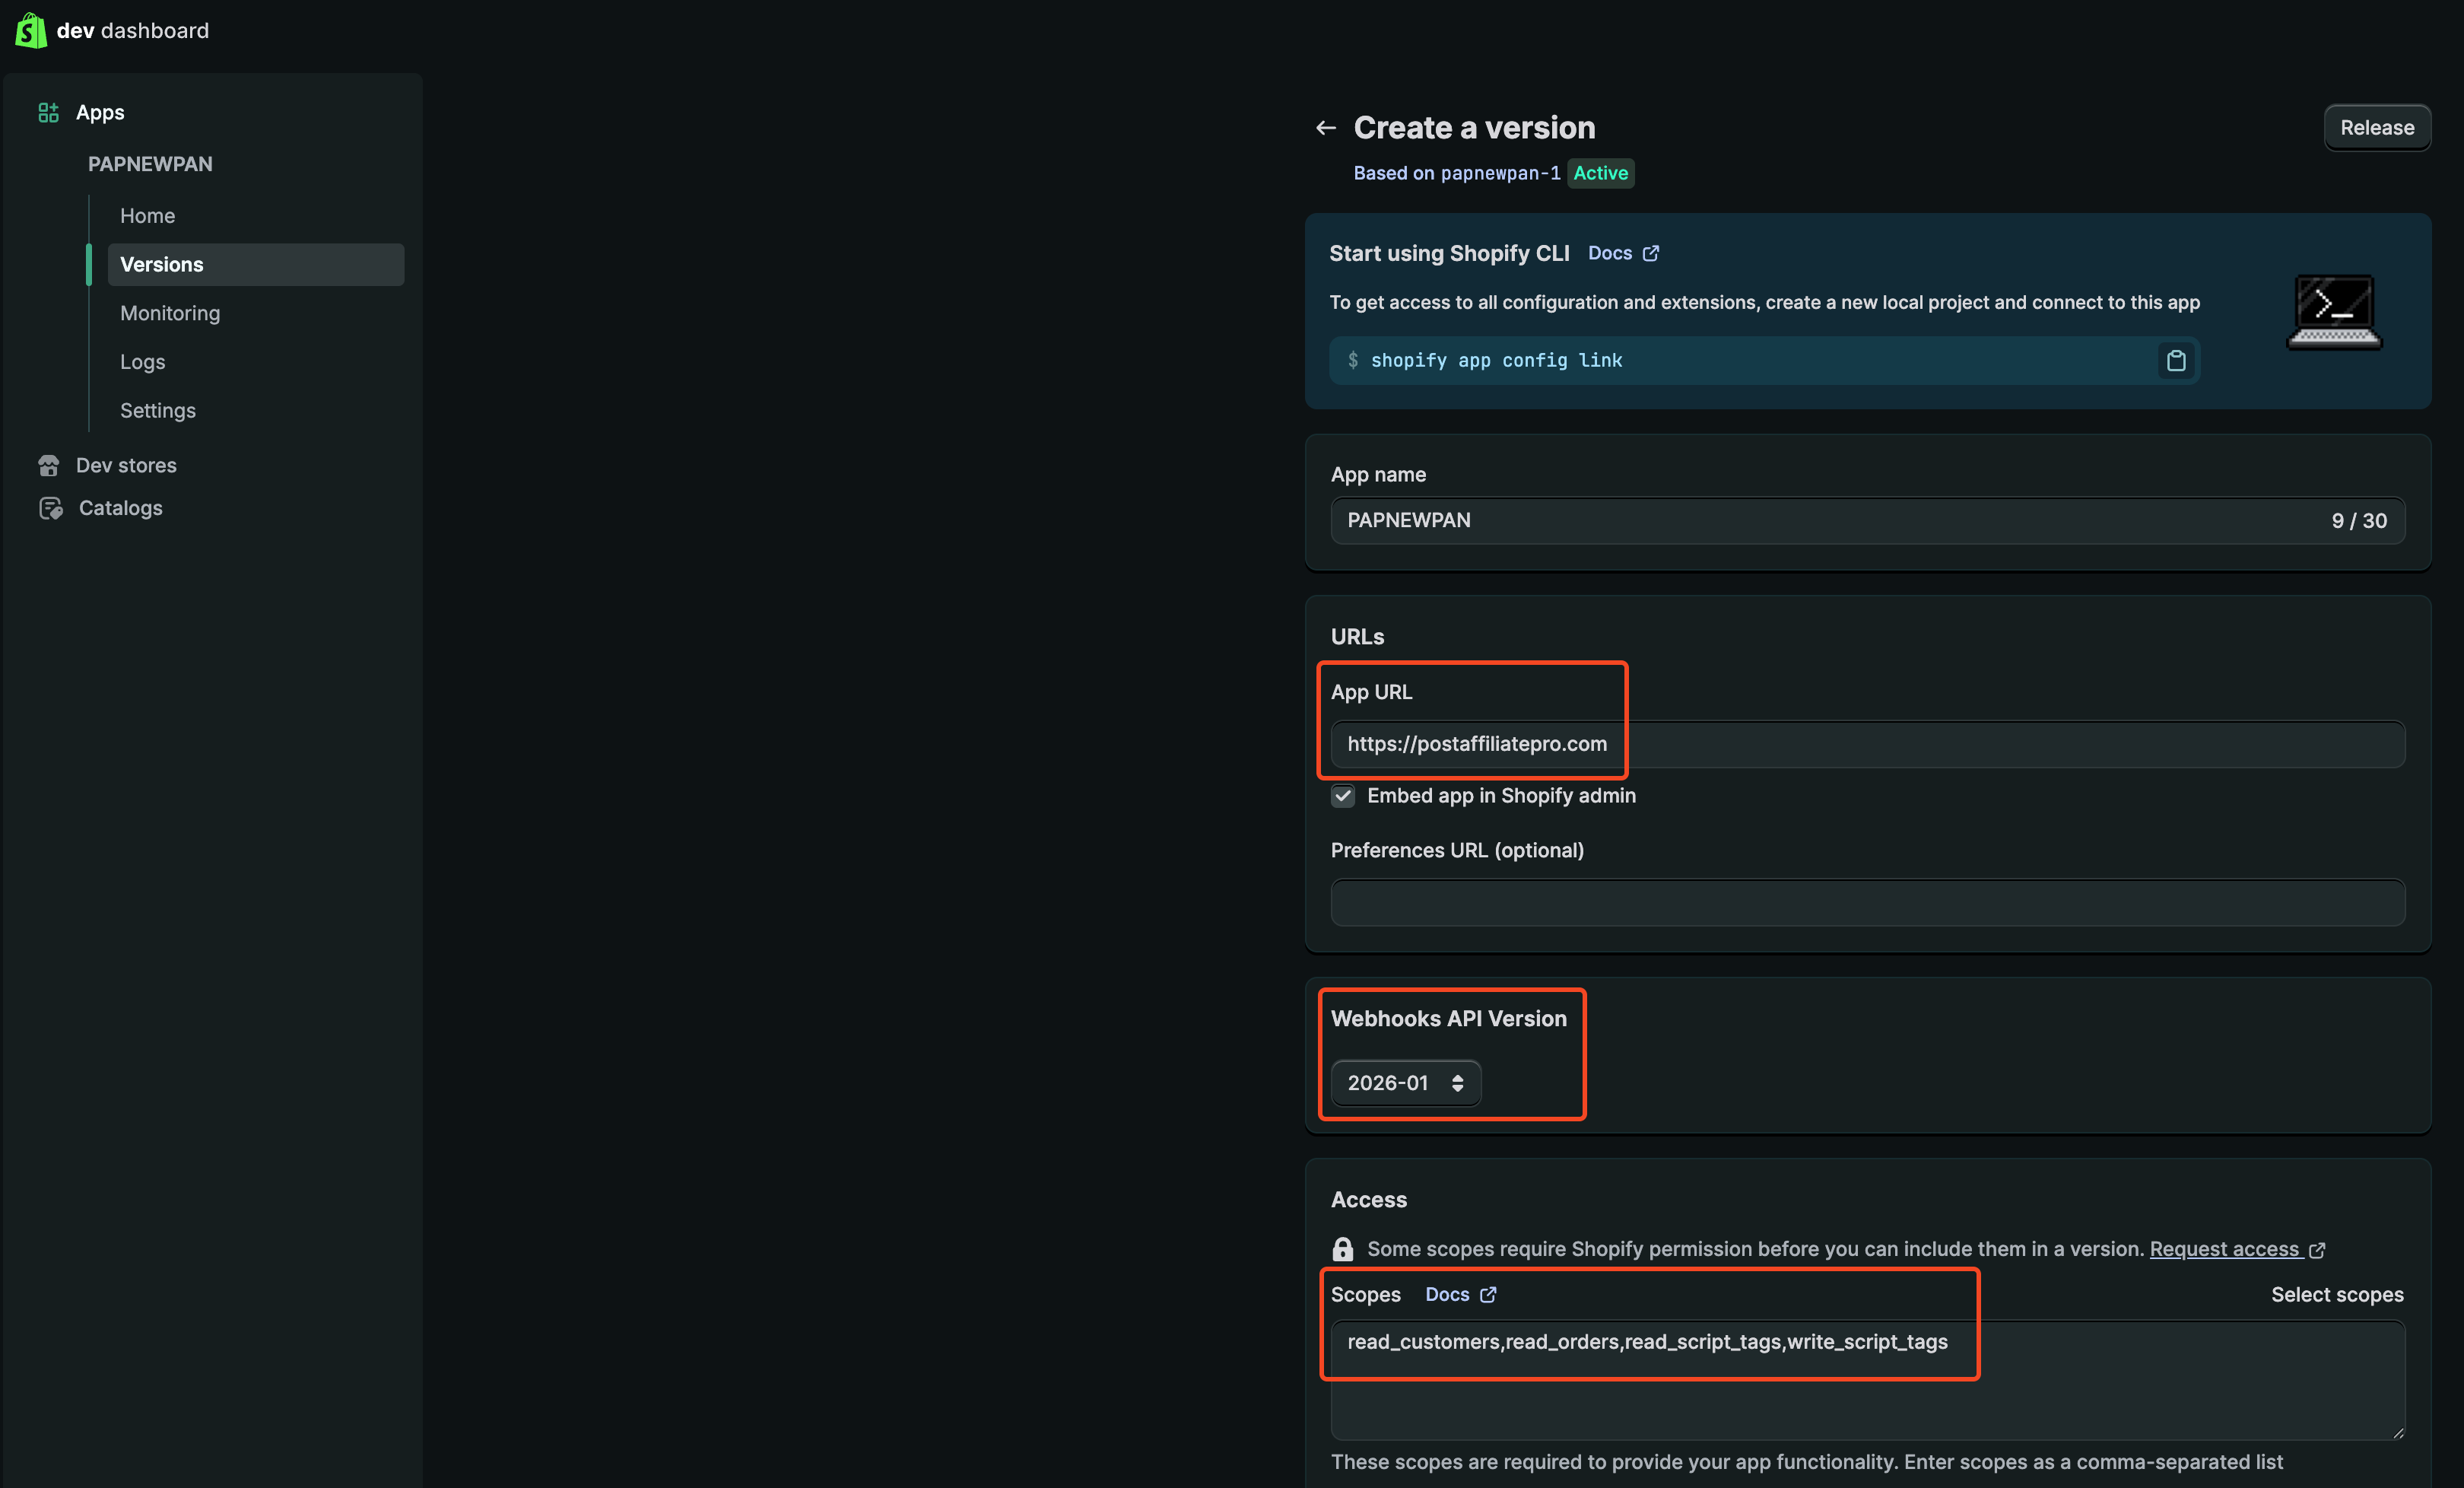
After finalizing the configuration, click the Release button and confirm the release of the new app version in the subsequent popup.
Navigate to the Home section in your application, then proceed with the installation by clicking the Install app button.

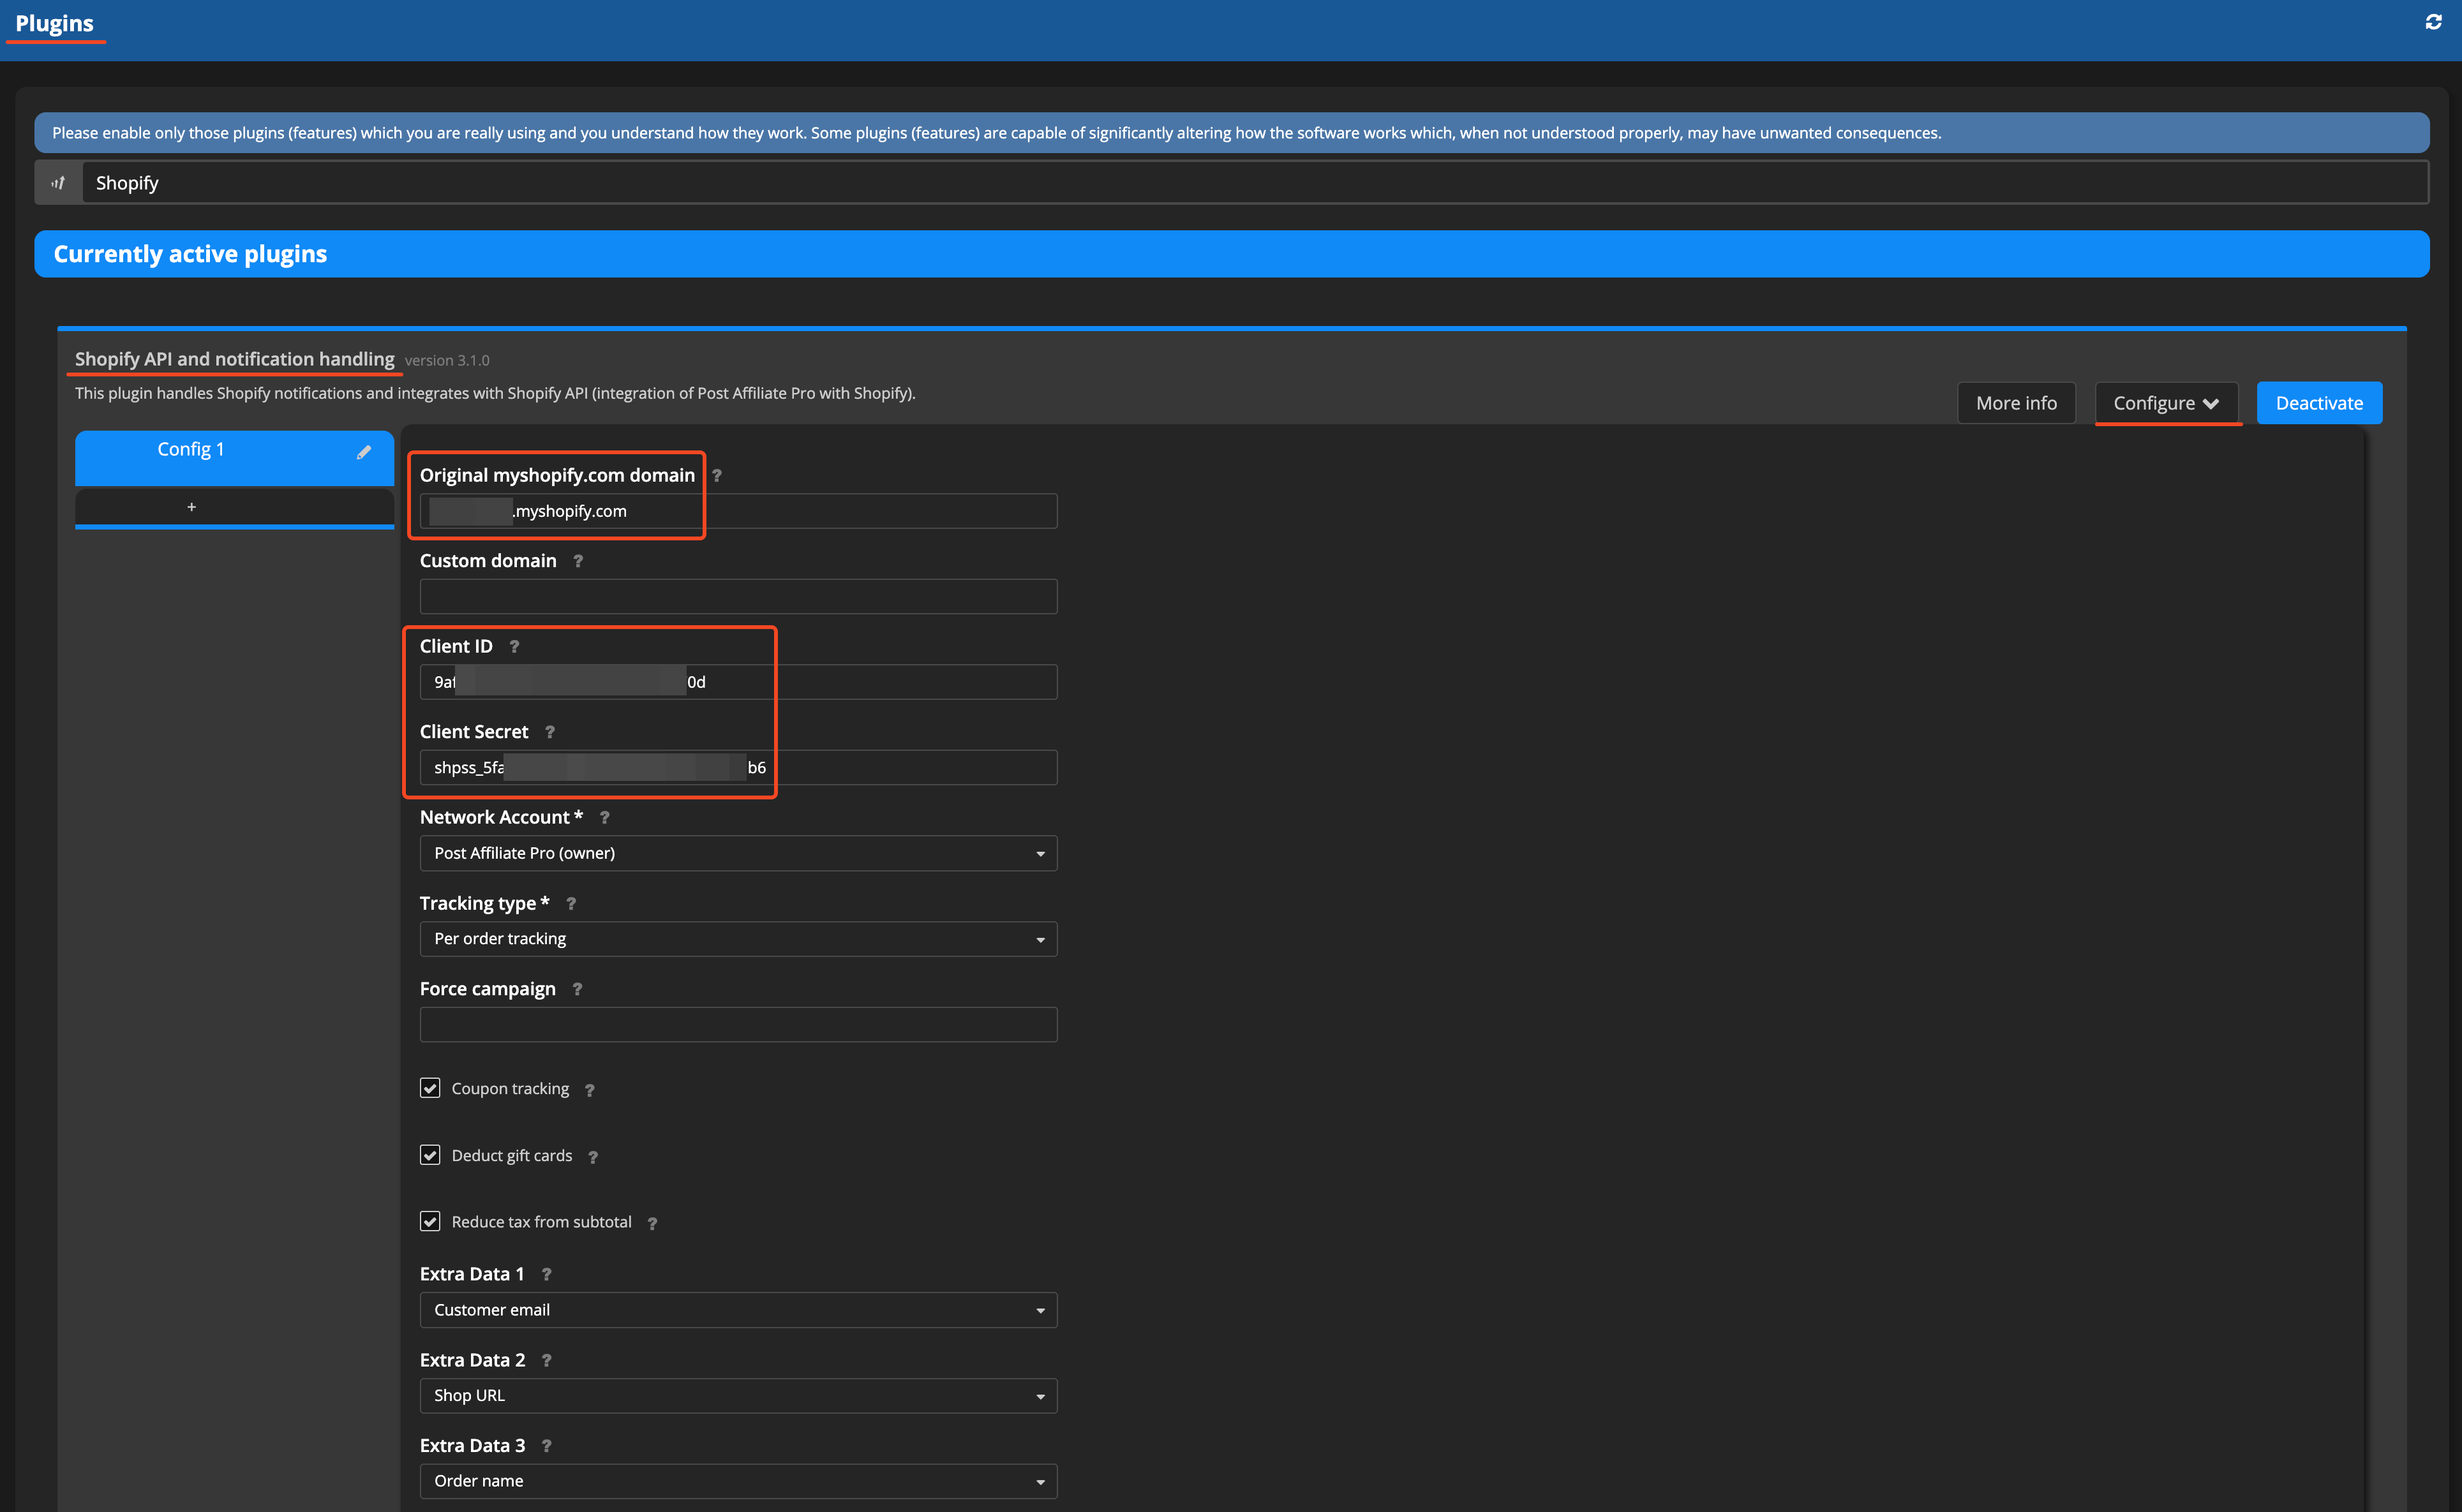
Next, go to the Post Affiliate Pro merchant panel and navigate to Configuration > Plugins. Locate the Shopify API and notification handling plugin. If it is not enabled, enable it first, then click the Configure button.
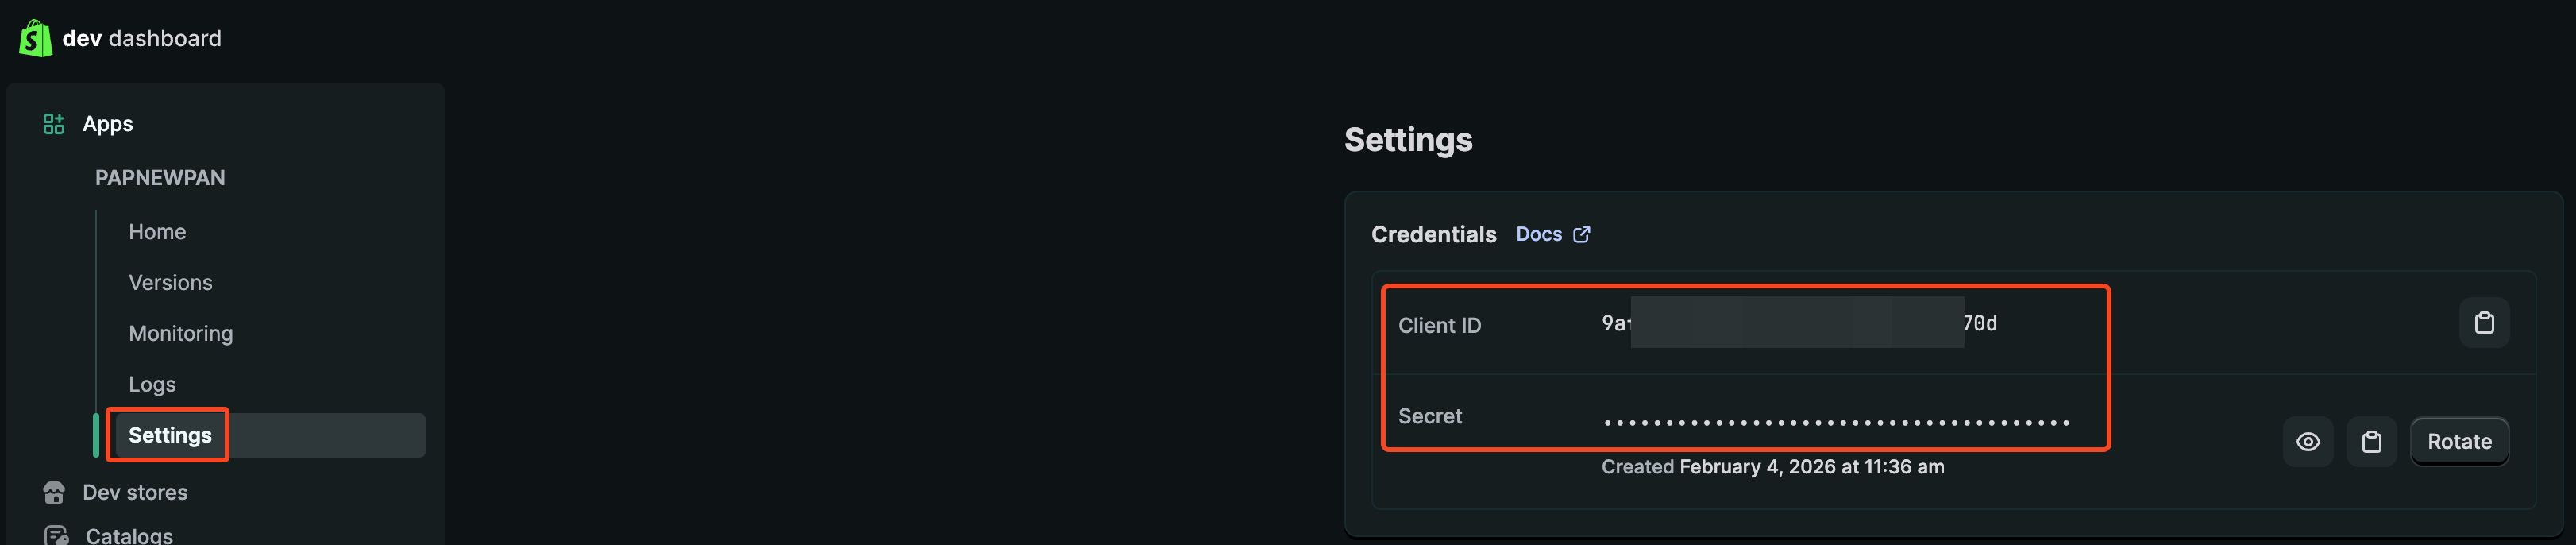
Enter your store URL, Client ID, Client Secret and configure the plugin to your preferences.
Shopify is a comprehensive commerce platform that empowers individuals and businesses to create online stores and manage their sales seamlessly, both online and in-person. Designed with user-friendliness in mind, Shopify provides the tools needed to build customizable online shops, manage products, and process transactions, all within a unified system. This platform aims to streamline e-commerce operations, making it easier for businesses of all sizes to optimize their online and retail presence.
Shopify’s journey began in 2004 when its founders launched an online store called Snowdevil to sell snowboarding equipment. Unsatisfied with the existing e-commerce solutions, they decided to build their own platform, which led to the official launch of Shopify in 2006. Since then, Shopify has experienced significant growth, continually innovating to meet the evolving needs of merchants.
Notable milestones include the introduction of Shopify Payments and Shopify POS, the launch of the Shopify Fulfillment Network, and the significant Shopify 2.0 update that enhanced customization capabilities. Today, Shopify supports nearly 2 million merchants worldwide, offering a robust platform for businesses to scale and thrive.
Shopify caters to a diverse range of business types and demographics. Whether it’s a small startup looking to establish an online presence, a medium-sized business expanding its reach, a brick-and-mortar store venturing into e-commerce, or a B2B company, Shopify provides tailored solutions to meet various needs. The platform benefits customers by simplifying the store setup process, offering robust e-commerce tools such as integrated payment and shipping options, providing marketing and SEO support, and delivering valuable analytics. Shopify’s flexibility and extensive ecosystem make it an attractive choice for businesses aiming to grow and optimize their online operations.
Shopify offers a multitude of features designed to support and enhance e-commerce businesses:
Shopify provides several pricing tiers to accommodate different business sizes and needs:
Each plan includes additional features tailored to the specific requirements of businesses at various stages. Shopify also offers a free trial period, allowing users to explore the platform’s capabilities before committing to a plan.
Users often praise Shopify for its ease of use, scalability, and 24/7 customer support . The platform’s comprehensive integration options make it a versatile tool for a wide range of businesses. However, some users note a few drawbacks, such as a limited selection of free themes, transaction fees for those not using Shopify Payments, and higher costs associated with premium plans. Despite these considerations, Shopify is widely viewed as a dynamic and reliable platform that effectively meets diverse business needs.
For those looking to see Shopify in action and hear detailed reviews, several YouTube videos offer valuable insights:
Shopify Review 2023: Pros and Cons You Need to Know
Watch on YouTube
Shopify 2023 Review: New Features & Pricing
Watch on YouTube
These reviews delve into the platform’s features, updates, and provide personal experiences from users, offering a well-rounded perspective on Shopify’s performance in the current market.
While Shopify is a leading e-commerce platform, there are noteworthy alternatives that might better suit specific business needs:
Each of these platforms offers unique features and benefits, catering to different aspects such as budget constraints, design preferences, or specific selling methods.
Enhance your Shopify store with powerful affiliate tracking and management. Try Post Affiliate Pro free for 1 month and see how easy it is to boost your e-commerce sales.
Learn how Post Affiliate Pro's Shopify integration enables product-level tracking, vendor-specific commissions, and advanced affiliate program management for yo...

Learn how to boost your Shopify store's revenue by easily adding affiliate marketing links! This step-by-step video guide shows how to use the 'Affiliate Market...

Learn how to integrate ReCharge (Shopify) with Post Affiliate Pro to efficiently track recurring payments for subscription products, manage affiliate commission...
Join our community of happy clients and provide excellent customer support with Post Affiliate Pro.

Cookie Consent
We use cookies to enhance your browsing experience and analyze our traffic. See our privacy policy.