
WooCommerce (WordPress module)
Would you like to improve your affiliate software even more? Check out the WooCommerce (WP module) integration for Post Affiliate Pro.
9 min read
WooCommerce
WordPress
+4


Learn how to integrate your Wix store with Post Affiliate Pro to track orders, customize thank you pages, and add click tracking codes. Enhance your e-commerce capabilities with seamless affiliate marketing integration.
Be the first to know about new features and product updates.
Create a free website with Wix.com. Choose a stunning template and customize anything with the Wix website builder—no coding skills needed.
This integration describes how to integrate the Wix store. If you are using Ecwid or PayPal buttons within Wix please use the methods for those solutions.
Log in to your Wix dashboard and edit your site. Once the Editor loads on the left side menu click the My Store button, then go to Store Pages and open the Thank You Page.
When the Thank You Page is loaded click Add button on the left side menu and under More select Embeds and from there add the HTML iframe element to your thank you page.
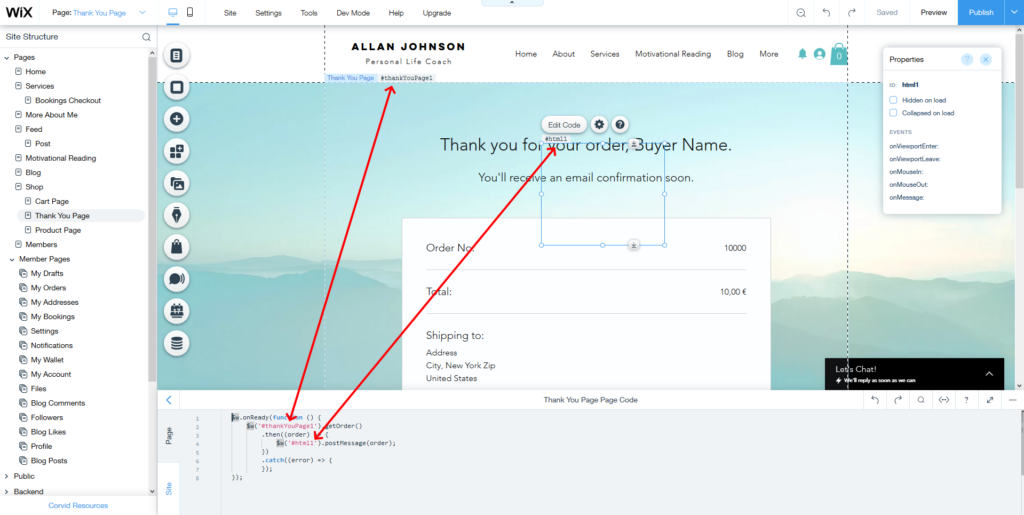
Now on the top bar of the editor find Dev Mode and click the button to Turn on Dev Mode. With the Dev Mode enabled click the Thank You Page Page Code bar which has appeared at the bottom of the screen.
Replace the code in this section with the one below where you need to replace the #thankYouPage1 and #html1 with the IDs of your own elements as shown on the below screenshot.
$w.onReady(function () {
	$w('#thankYouPage1').getOrder()
		.then((order) => {
			$w('#html1').postMessage(order);
		})
		.catch((error) => {
		});
});
Still on the thank you page editor enter the following code into the HTML element which you had added to your page:
<script id="pap_x2s6df8d" src="https://URL_TO_PostAffiliatePro/scripts/trackjs.js" type="text/javascript"></script>
<script type="text/javascript">
                   window.onmessage = (event) => {
                     if (event.data) {
                      var orderObject = event.data;
                      var totalCost = 0;
                      var productIds = [];
                         for (i = 0; i < orderObject.lineItems.length; i++) {
                              totalCost += orderObject.lineItems[i].totalPrice - orderObject.lineItems[i].discount;
                         if (orderObject.lineItems[i].taxIncludedInPrice === true) {
                              totalCost -= orderObject.lineItems[i].tax;
                         }
                         if (orderObject.lineItems[i].sku != undefined) {
                              productIds.push(orderObject.lineItems[i].sku);
                         } else {
                              productIds.push(orderObject.lineItems[i].productId);
                         } }
                         PostAffTracker.setAccountId('Account_ID'); var sale = PostAffTracker.createSale();
                         sale.setTotalCost(totalCost);
                         sale.setOrderID(orderObject.number);
                         sale.setCurrency(orderObject.currency);
                         sale.setProductID(productIds);
                   if (orderObject.discount !== undefined && orderObject.discount !== null && orderObject.discount.appliedCoupon !== undefined && orderObject.discount.appliedCoupon !== null) {
                      sale.setCoupon(orderObject.discount.appliedCoupon.code);
                      }
                PostAffTracker.register();
               }
            }
</script>
If you wish to track the customer’s email address, phone or name you can use variables orderObject.buyerInfo.email, orderObject.buyerInfo.phone, orderObject.buyerInfo.firstName, orderObject.buyerInfo.lastName.
Have a look at Wix documentation to see an example of the whole orderObject.
Once you have the codes added Publish the page.
Still on the thank you page editor enter the following code into the HTML element which you had added to your page:
<script id="pap_x2s6df8d" src="https://URL_TO_PostAffiliatePro/scripts/trackjs.js" type="text/javascript"></script>
<script type="text/javascript">
	window.onmessage = (event) => {
		if (event.data) {
			var orderObject = event.data;
			PostAffTracker.setAccountId('Account_ID');
			for (i = 0; i < orderObject.lineItems.length; i++) {
				totalCost = orderObject.lineItems[i].totalPrice - orderObject.lineItems[i].discount;
				if (orderObject.lineItems[i].taxIncludedInPrice === true) {
					totalCost -= orderObject.lineItems[i].tax;
				}
				if (orderObject.lineItems[i].sku != undefined) {
					productId = orderObject.lineItems[i].sku;
				} else {
					productId = orderObject.lineItems[i].productId;
				}
				var sale = PostAffTracker.createSale();
				sale.setTotalCost(totalCost);
				sale.setOrderID(orderObject.number + '(' + i + ')');
				sale.setCurrency(orderObject.currency);
				sale.setProductID(productId);
			  if (orderObject.discount !== undefined && orderObject.discount !== null && orderObject.discount.appliedCoupon !== undefined && orderObject.discount.appliedCoupon !== null) {
			    sale.setCoupon(orderObject.discount.appliedCoupon.code);
			  }
				if (i < orderObject.lineItems.length -1) {
					sale.doNotDeleteCookies();
				}
			}
			PostAffTracker.register();
		}
	}
</script>
If you wish to track the customer’s email address, phone or name you can use variables orderObject.buyerInfo.email, orderObject.buyerInfo.phone, orderObject.buyerInfo.firstName, orderObject.buyerInfo.lastName.
Have a look at Wix documentation to see an example of the whole orderObject.
Once you have the codes added Publish the page.
The last step is to add the click tracking code to all pages of your Wix website. To do that navigate to your Wix dashboard and then to Settings > Custom code.
On the screen which opens paste the code which you can get in your Post Affiliate Pro merchant panel under Tools > Integration> Clicks tracking and have it added to Body – end and loaded on All pages once.
Wix is a comprehensive website creation and management platform that empowers users to build professional websites with ease. Established in 2006, Wix offers a user-friendly drag-and-drop editor, mobile site editing, and an extensive array of design features. With over 900 professional templates, the platform caters to a wide range of industries and purposes. Whether you need eCommerce capabilities, SEO integration, blogging tools, or portfolio management, Wix provides the functionalities to support your online presence.
Wix was founded by Avishai Abrahami, Nadav Abrahami, and Giora Kaplan with the vision of making website creation accessible to everyone. Key milestones in Wix’s history include:
Wix caters to a diverse audience, including:
For larger organizations, Wix offers Enterprise Solutions with customized plans tailored to specific business needs and scales.
Users often praise Wix for:
However, some users have noted:
If you’re exploring other website builders, consider these alternatives:
Each platform offers unique features and pricing structures, so it’s essential to assess which aligns best with your specific needs.
Lucia is a talented content editor who ensures the seamless publication of content across multiple platforms.

Experience seamless affiliate integration with Wix and Post Affiliate Pro. Start your 30-day free trial today and boost your online business.
Would you like to improve your affiliate software even more? Check out the WooCommerce (WP module) integration for Post Affiliate Pro.

Would you like to improve your affiliate software even more? Check out the General solution - Asynchronous integration for Post Affiliate Pro.

Would you like to improve your affiliate software even more? Check out the ShopSite integration for Post Affiliate Pro.
Join our community of happy clients and provide excellent customer support with Post Affiliate Pro.

Cookie Consent
We use cookies to enhance your browsing experience and analyze our traffic. See our privacy policy.