
CoreCommerce
Easily integrate CoreCommerce with Post Affiliate Pro to enhance your affiliate marketing. Learn step-by-step instructions for sale tracking, PayPal integration...
7 min read
E-commerce
Integration
+3


Learn how to integrate CommerceGate with Post Affiliate Pro for seamless online payment processing, lifetime commissions, and secure affiliate management. Enhance your e-commerce platform with robust payment solutions, transparent pricing, and easy integration.
Be the first to know about new features and product updates.
An online payment processing company established in Europe since 2006.
CommerceGate provides a complete set of online billing solutions that can be instantly used to sell your services to your costumers quickly and safely. The integration with it is pretty simple thanks to built-in plugin in Post Affiliate Pro .
It handles automatic affiliate signup, declining of affiliate in case they stopped paying for membership. It supports lifetime commissions and per product ordering.
The first step is to integrate the payment form. Each form is pointing to commercegate secure URL:
https://secure.commercegate.com/payment/ccform.php?cid=XXXXX&wid=YYYYY
where XXXXX is your commercegate account ID and YYYYY is a special code for your (validated) website.
The integration is based on commercegate option of using custom data. In case you are using op1 already, use op2 or op3. In our example, we are using op1. Add this code to the code of your payment form:
<script id="pap_x2s6df8d" src="https://URL_TO_PostAffiliatePro/scripts/trackjs.js" type="text/javascript"></script>
<script type="text/javascript">
PostAffTracker.writeVisitorIdToAttribute('vd35c0e5hw','action','op1');
</script>
As you can see, the function writeVisitorIdToAttribute() uses a value vd35c0e5hw and also op1. The value vd35c0e5hw is used to identify the form, so your payment form has to have an ID:
<form id="vd35c0e5hw" ...>
The op1 value is the custom value. In case you need to change one of the two values mentioned above, you can do it.
Second step is to activate CommerceGate plugin in your Post Affiliate Pro. Just navigate to Plugins section, activate and configure it.
The last step is to setup Callbacks in your CommerceGate admin panel. Navigate to Gateway Configuration section and use the following link as a value for Callback URL:
https://URL_TO_PostAffiliatePro/plugins/CommerceGate/commercegate.php
In case you are already using the Callback URL field for another URL, just ask commercegate technical team to configure another URL for you – provide them with your plugin URL (from above). They will help you.
Finally, set the Callback type to XML. That is all you have to do.
Do not forget to integrate your site with the click tracking code.
CommerceGate is a comprehensive payment processing platform designed to securely manage digital transactions for online businesses worldwide. Established in 2006 in Barcelona, Spain, CommerceGate has become a leader in providing tailored solutions for various industries, with a particular focus on the rapidly growing Latin American (LATAM) markets. The platform offers a suite of tools including payment gateways, billing platforms, acquiring solutions, risk and compliance services, and proprietary offerings like customized corporate and personal credit cards, as well as an eWallet system.
Founded with the aim of enhancing digital payment processing, CommerceGate began by forging strong relationships with financial institutions across Europe. Over the years, the company expanded its footprint, introducing innovations such as Billing 2.0 and CGPayTech. With licensing from the Central Bank of Spain, CommerceGate extended its services to the LATAM region, particularly Brazil and Mexico, solidifying its position as a leader in high-risk online payment processing.
CommerceGate targets virtual merchants in the e-commerce sector who require efficient and secure payment processing solutions. The platform is ideal for online businesses seeking multiple payment options to improve conversion rates and manage cash flow effectively. Whether you run an online marketplace, affiliate program , agency, or banking institution, CommerceGate offers tailored solutions to maximize client lifetime value and boost authorization rates in global markets.
CommerceGate stands out in the market due to its robust set of features designed to meet the diverse needs of online businesses:
CommerceGate operates on a custom pricing model, leveraging global partnerships to offer competitive domestic rates. The platform supports a multitude of global and local payment methods, ensuring secure and scalable payment processing across different industries. By providing transparent pricing without hidden fees, CommerceGate enables businesses to plan effectively without worrying about unexpected costs.
Pros of CommerceGate:
Cons of CommerceGate:
Overall User Experience:
Users generally report a positive experience with CommerceGate, highlighting excellent trust and transparency in their dealings with the company. The platform has received a rating of 3.8 out of 5 on Trustpilot, reflecting a high level of customer satisfaction.
While CommerceGate offers a robust platform with comprehensive features, there are several alternatives available in the market:
Lucia is a talented content editor who ensures the seamless publication of content across multiple platforms.

Discover how integrating CommerceGate with Post Affiliate Pro streamlines your payment processing and boosts affiliate program performance.
Easily integrate CoreCommerce with Post Affiliate Pro to enhance your affiliate marketing. Learn step-by-step instructions for sale tracking, PayPal integration...
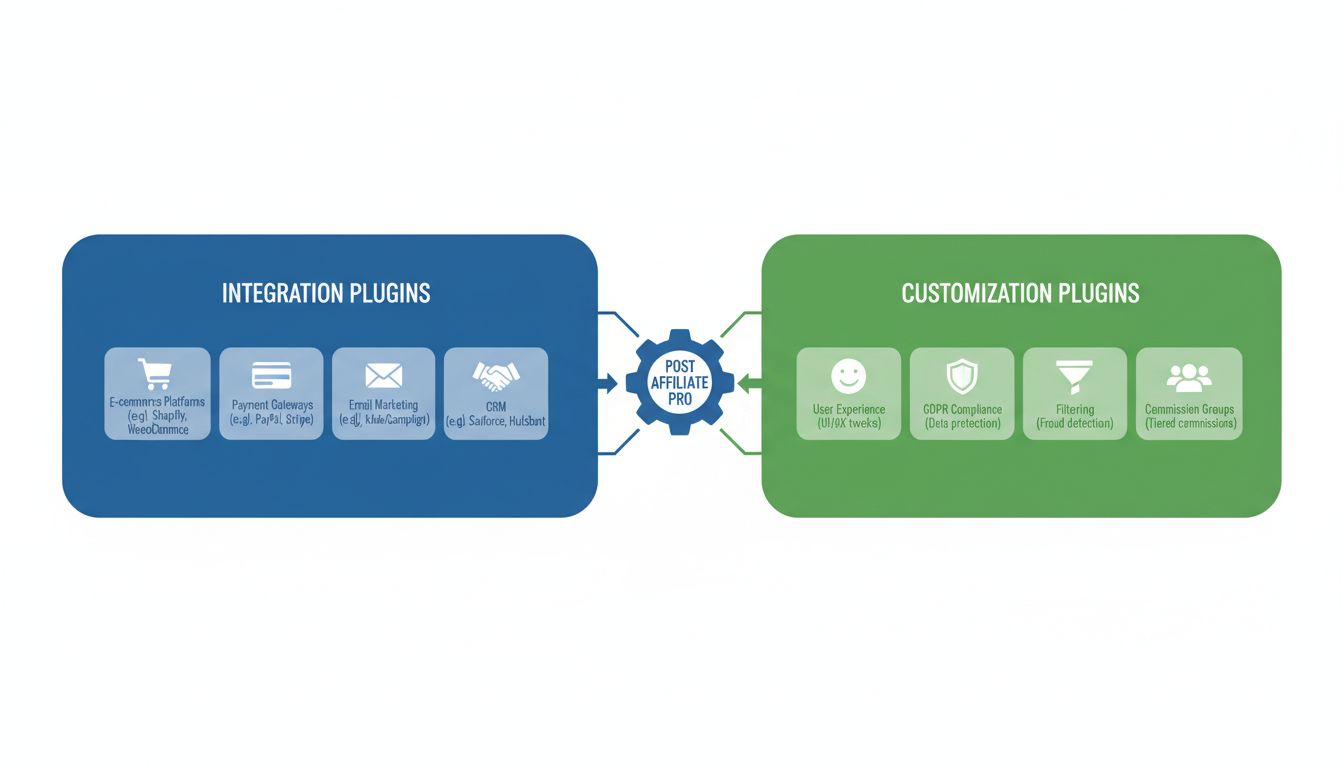
Discover the comprehensive plugin ecosystem of Post Affiliate Pro. Learn about integration plugins for e-commerce, payment gateways, and email marketing, plus c...

Integrate RocketGate with Post Affiliate Pro to streamline your online payments. Learn how to connect your affiliate software with RocketGate’s advanced payment...
Join our community of happy clients and provide excellent customer support with Post Affiliate Pro.
