Fraud protection only helps if it is switched on and tuned to your program. Post Affiliate Pro has a set of rules that look at every click, sale, affiliate signup and login, and each rule has its own switch and its own action. You decide what happens to the traffic that matches.
This tutorial shows how to set up fraud protection in Post Affiliate Pro. It walks through the fraud protection settings tab by tab, then covers the two controls that sit outside it: secret keys for sales and approval of commissions. For the bigger picture on spotting fraud, read our guide to affiliate fraud detection and prevention . If you need the basics first, start with what affiliate fraud is .
In short
- Open Configuration > Tracking Settings > Fraud Protection and work through the four tabs.
- Set up duplicate order prevention and catch repeated clicks, and choose Decline while you test.
- Keep lists of IP addresses, referrer URLs and countries you want to ban or allow.
- Protect affiliate signups and logins with their own rules and limits.
- Validate sales with a secret key if you can change your checkout code.
- Approve commissions manually, or after a set number of days, before they are paid.
Before you start
You need access to the merchant panel with permission to change settings. Set aside half an hour, and write down the IP addresses, referrer domains and countries you already know are a problem.
Every rule asks you what to do with a match, and the two main answers are different:
- Decline: the click or transaction is recorded and marked as declined, so you can still look at it.
- Don’t save (shown as “Dont save” in the menu): it is ignored silently and leaves no record.
If you are unsure about a rule, choose Decline first. You can check what it catches and switch to Don’t save later.

Launch your affiliate program today
Set up advanced tracking in minutes. No credit card required.
Step 1: open the Fraud Protection screen
- Log in to the merchant panel.
- Go to Configuration > Tracking Settings > Fraud Protection.
- You will see four tabs: Clicks, Sales / Action commissions, Affiliate signups and Logins.
- Save each tab before you move to the next one.
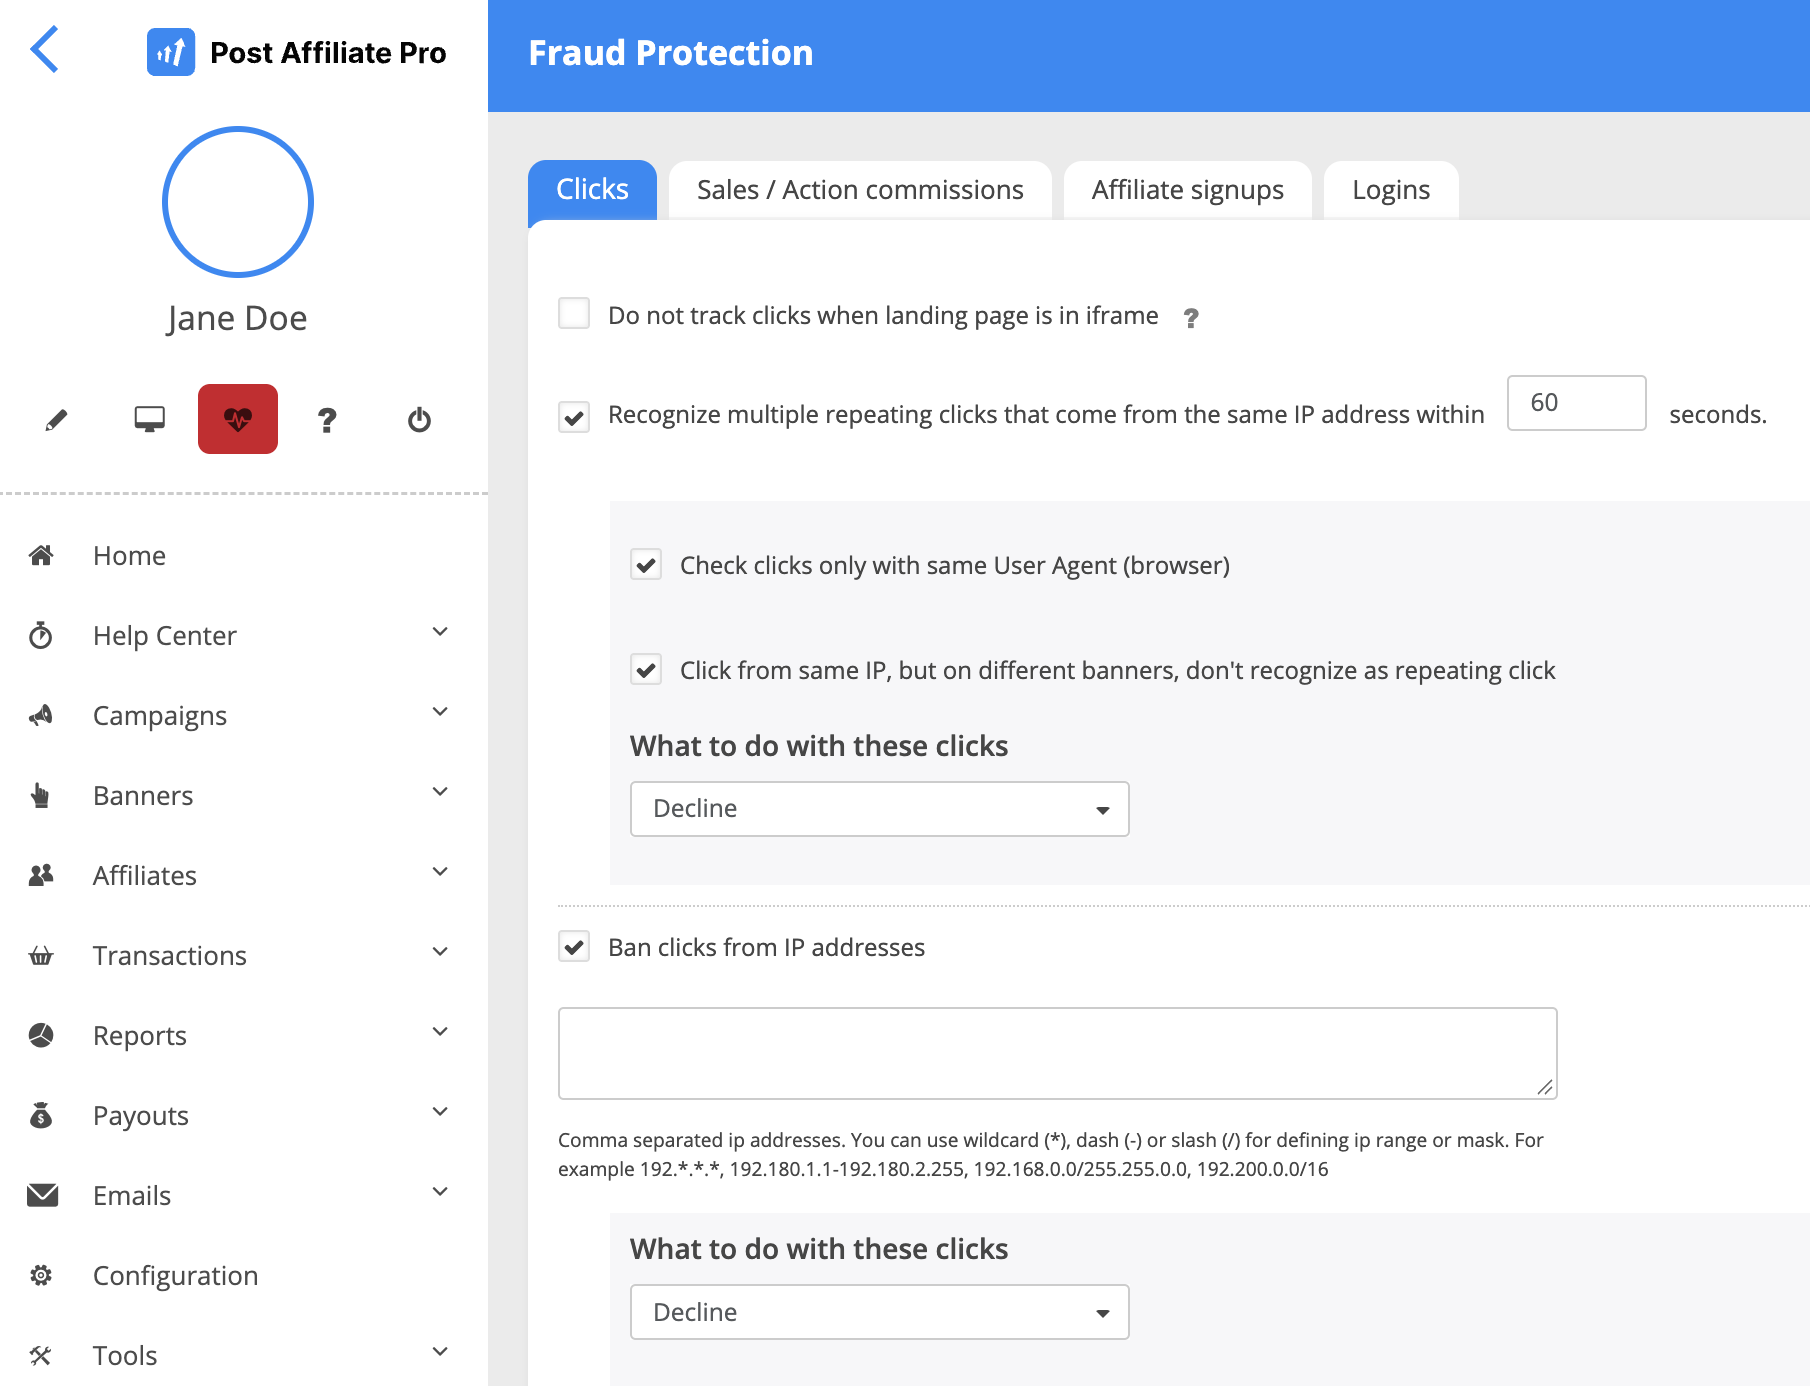
The screen’s own help text names the two situations it is built for: repeating or fraudulent transactions that come from the same IP address, or with the same order ID. It also gives the most common cause of repeats, a customer who refreshes the order confirmation page, and recommends filtering out or declining duplicate orders with the same order ID.
The Fraud Protection feature page gives an overview of the same rules. This tutorial shows how to set them up.
Step 2: set up the Clicks tab
Open the Clicks tab. It has four groups of settings.
Repeated clicks
- Tick Recognize multiple repeating clicks that come from the same IP address within.
- Enter a number of seconds. Pick a window that matches how fast a real visitor could click twice.
- Optional: tick Check clicks only with same User Agent (browser). A repeat is then counted only when the browser matches as well.
- Optional: tick Click from same IP, but on different banners, don’t recognize as repeating click.
- Under What to do with these clicks, choose Decline while you test. This is how you decline repeated clicks and still keep a record of them.
This is the rule behind what our glossary calls click fraud : the same source producing clicks that no real visitor would.
Tip: the rule is off by default. When you switch it on, the default window is 60 seconds and the default action is Decline. A real visitor rarely clicks the same affiliate link twice from one IP address within that time. Tick Check clicks only with same User Agent (browser) if many of your visitors share one address, for example in an office or on a mobile network, so they are not counted as one.
IP address lists
You can ban IP addresses in your affiliate software, or allow only the ones you trust:
- Ban clicks from IP addresses: blocks the addresses you name.
- Allow only clicks from IP addresses: every address that is not on the list counts as not allowed.
Use an allow-only list only when you know the full set of sources. For each list, choose the action for matching clicks, and choose Decline while you test so you can see what the list blocks.
Enter the addresses separated by commas. You can use a wildcard (*), a dash (-) for a range or a slash (/) for a mask, for example 192.*.*.*, 192.180.1.1-192.180.2.255, 192.168.0.0/255.255.255.0 or 192.200.0.0/16.
Tip: take the addresses from real data. On Transactions > Clicks list, the Custom filter lets you search by IP, and you can see which addresses sent the suspicious clicks.
Referrer URL lists
- Ban clicks from urls (HTTP_REFERER): blocks clicks that come from the URLs you name.
- Allow only clicks from urls (HTTP_REFERER): counts only clicks from the URLs you name. It also has the options and clicks from banner destination domains and allow empty referrer (HTTP_REFERER).
Enter the URLs separated by commas. Wildcards work in the form *exampleurl.com*. Choose What to do with not allowed clicks for each list.
Tip: the Clicks list shows the referrer URL of each click. Use it to see which sites send fraudulent traffic, then add those domains to the ban list, for example *badsite.com*. Use the allow-only list only if you control all legitimate traffic sources.
Two smaller options
- Do not track clicks when landing page is in iframe: clicks from an iframe are not tracked. The screen links to a page about cookie stuffing next to it.
- Disable clicks fraud protection for: excludes the affiliates you choose from the click checks.
Join our newsletter
Be the first to know about new features and product updates.
Step 3: set up the Sales / Action commissions tab
This is the tab that protects your money, so spend the most time here. Open the Sales / Action commissions tab.
Duplicate order IDs
- Tick Recognize duplicate orders coming with the same order ID within.
- Enter a number of hours, counted from the initial sale. This is the check the screen recommends, because a refreshed confirmation page sends the same sale again. If you already see declined duplicates, the FAQ on declined duplicate commissions explains where they come from.
- Optional: tick Apply also to empty OrderIDs to include sales that arrive without an order ID.
- Optional: limit the match to the same campaign, the same product ID or the same commission type.
- Under What to do with these orders, choose Decline while you test.
Tip: this check is switched on by default, with the action Decline, matching on the same product ID, and a window of 99999 hours, which means practically always. Keep the long window unless your shop reuses order IDs, for example after a reset of the order counter. In that case shorten the window or limit the match to the same campaign.
Duplicate orders from the same IP address
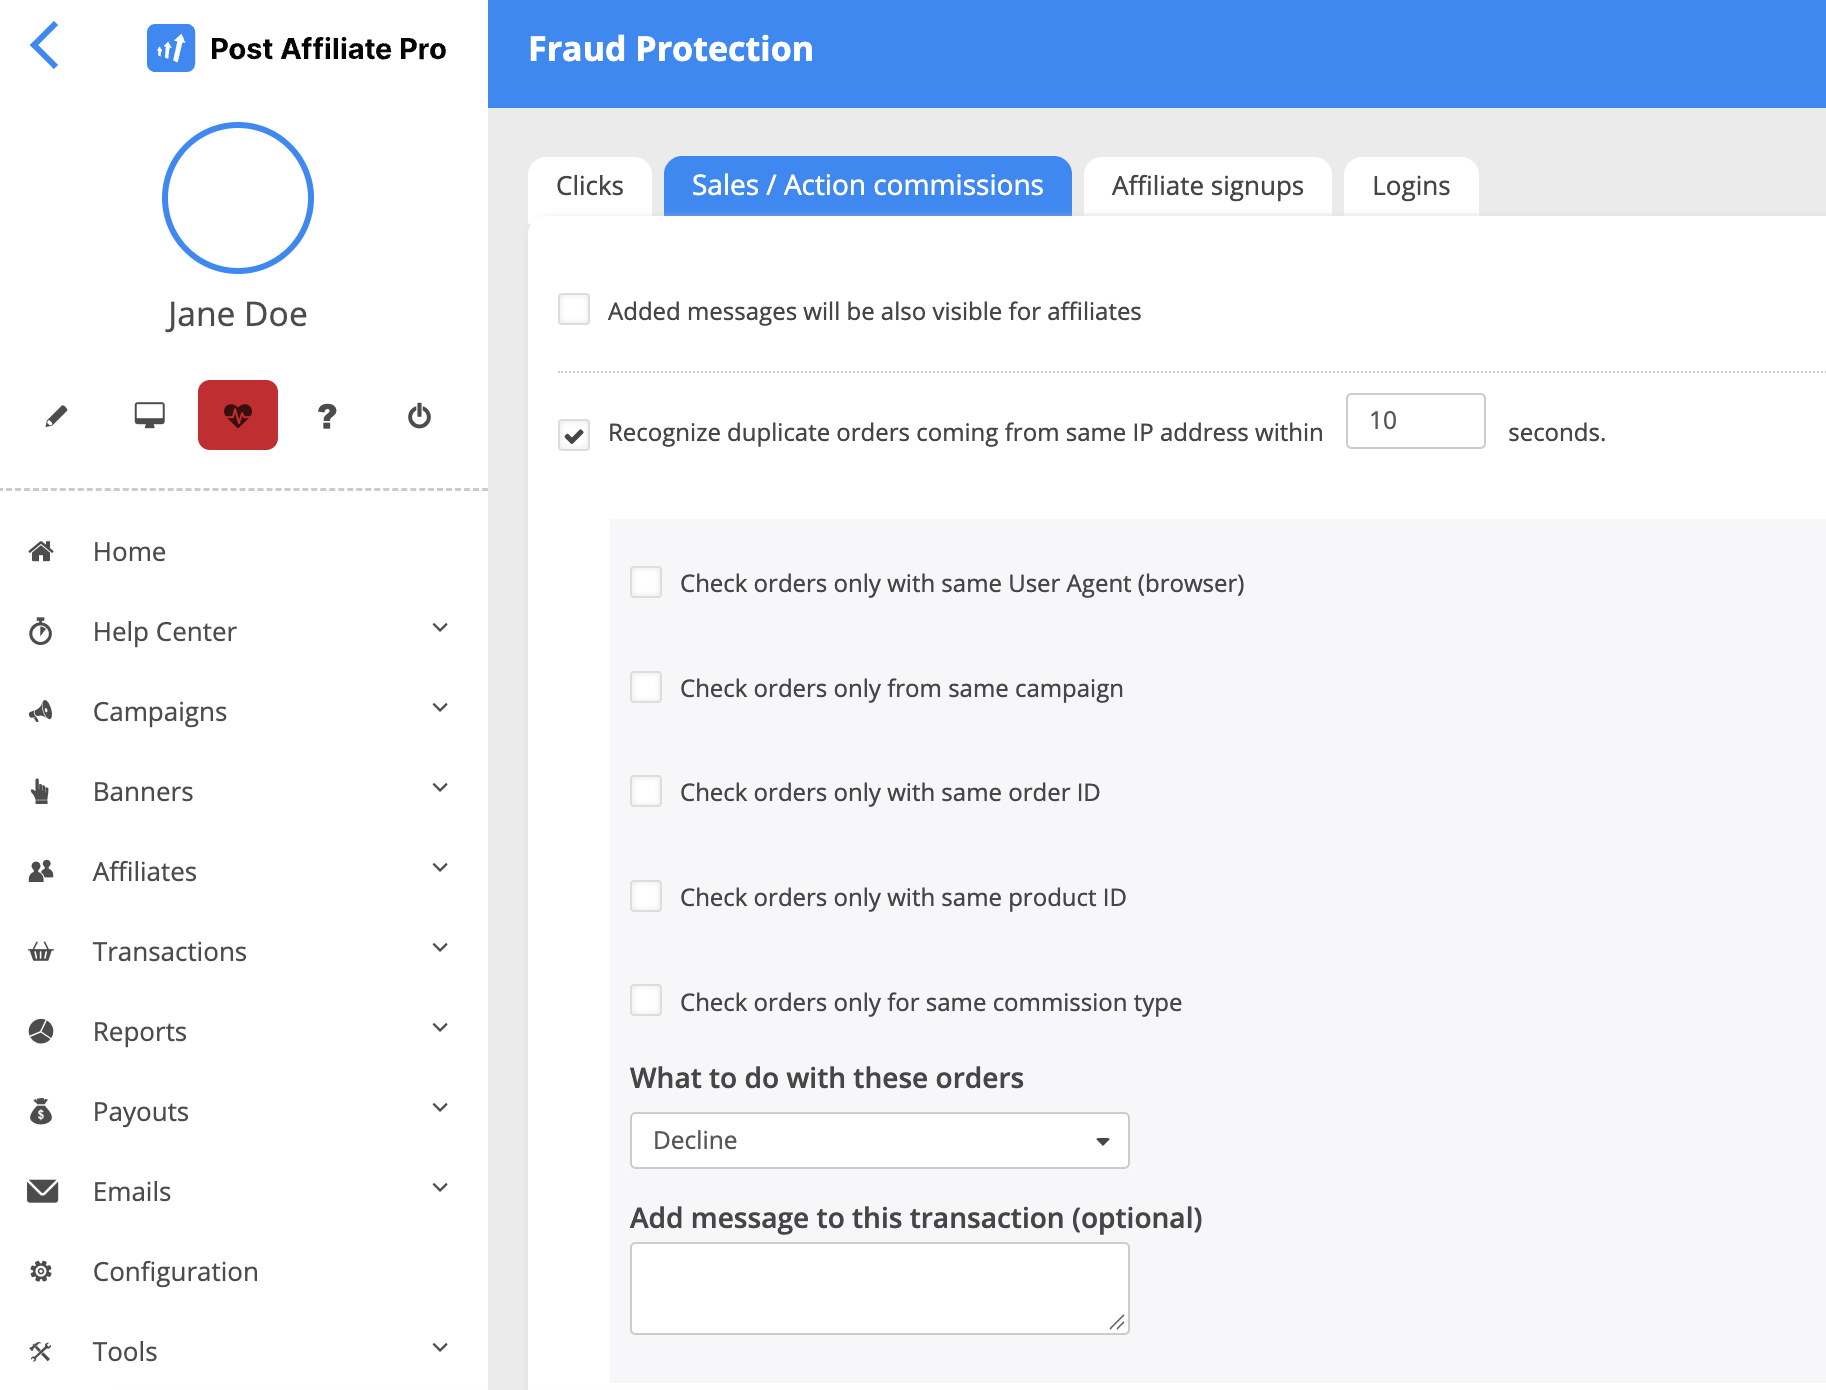
- Tick Recognize duplicate orders coming from same IP address within.
- Enter a number of seconds.
- Optional: narrow the match with these options:
- Check orders only with same User Agent (browser)
- Check orders only from same campaign
- Check orders only with same order ID
- Check orders only with same product ID
- Check orders only for same commission type
- Under What to do with these orders, choose Decline while you test.
Narrow the match enough that two real customers behind one office connection are not treated as one.
Tip: this rule is off by default. When you switch it on, the default window is 10 seconds and the default action is Decline. A short window catches double submits and bots, and the narrowing options keep real customers safe. Ticking the same product ID and the same campaign is a safe way to start.
When the action is Decline, the field Add message to this transaction (optional) appears. The message is saved in the transaction’s system note, which only you can see. If you tick Added messages will be also visible for affiliates on this tab, affiliates see it as well.
IP and referrer lists for sales
- Ban sales from IP addresses
- Allow only sales from IP addresses
- Ban sales from urls (HTTP_REFERER)
- Allow only sales from urls (HTTP_REFERER)
They work like their click counterparts, and each has its own action.
Step 4: protect affiliate signups
- Open the Affiliate signups tab.
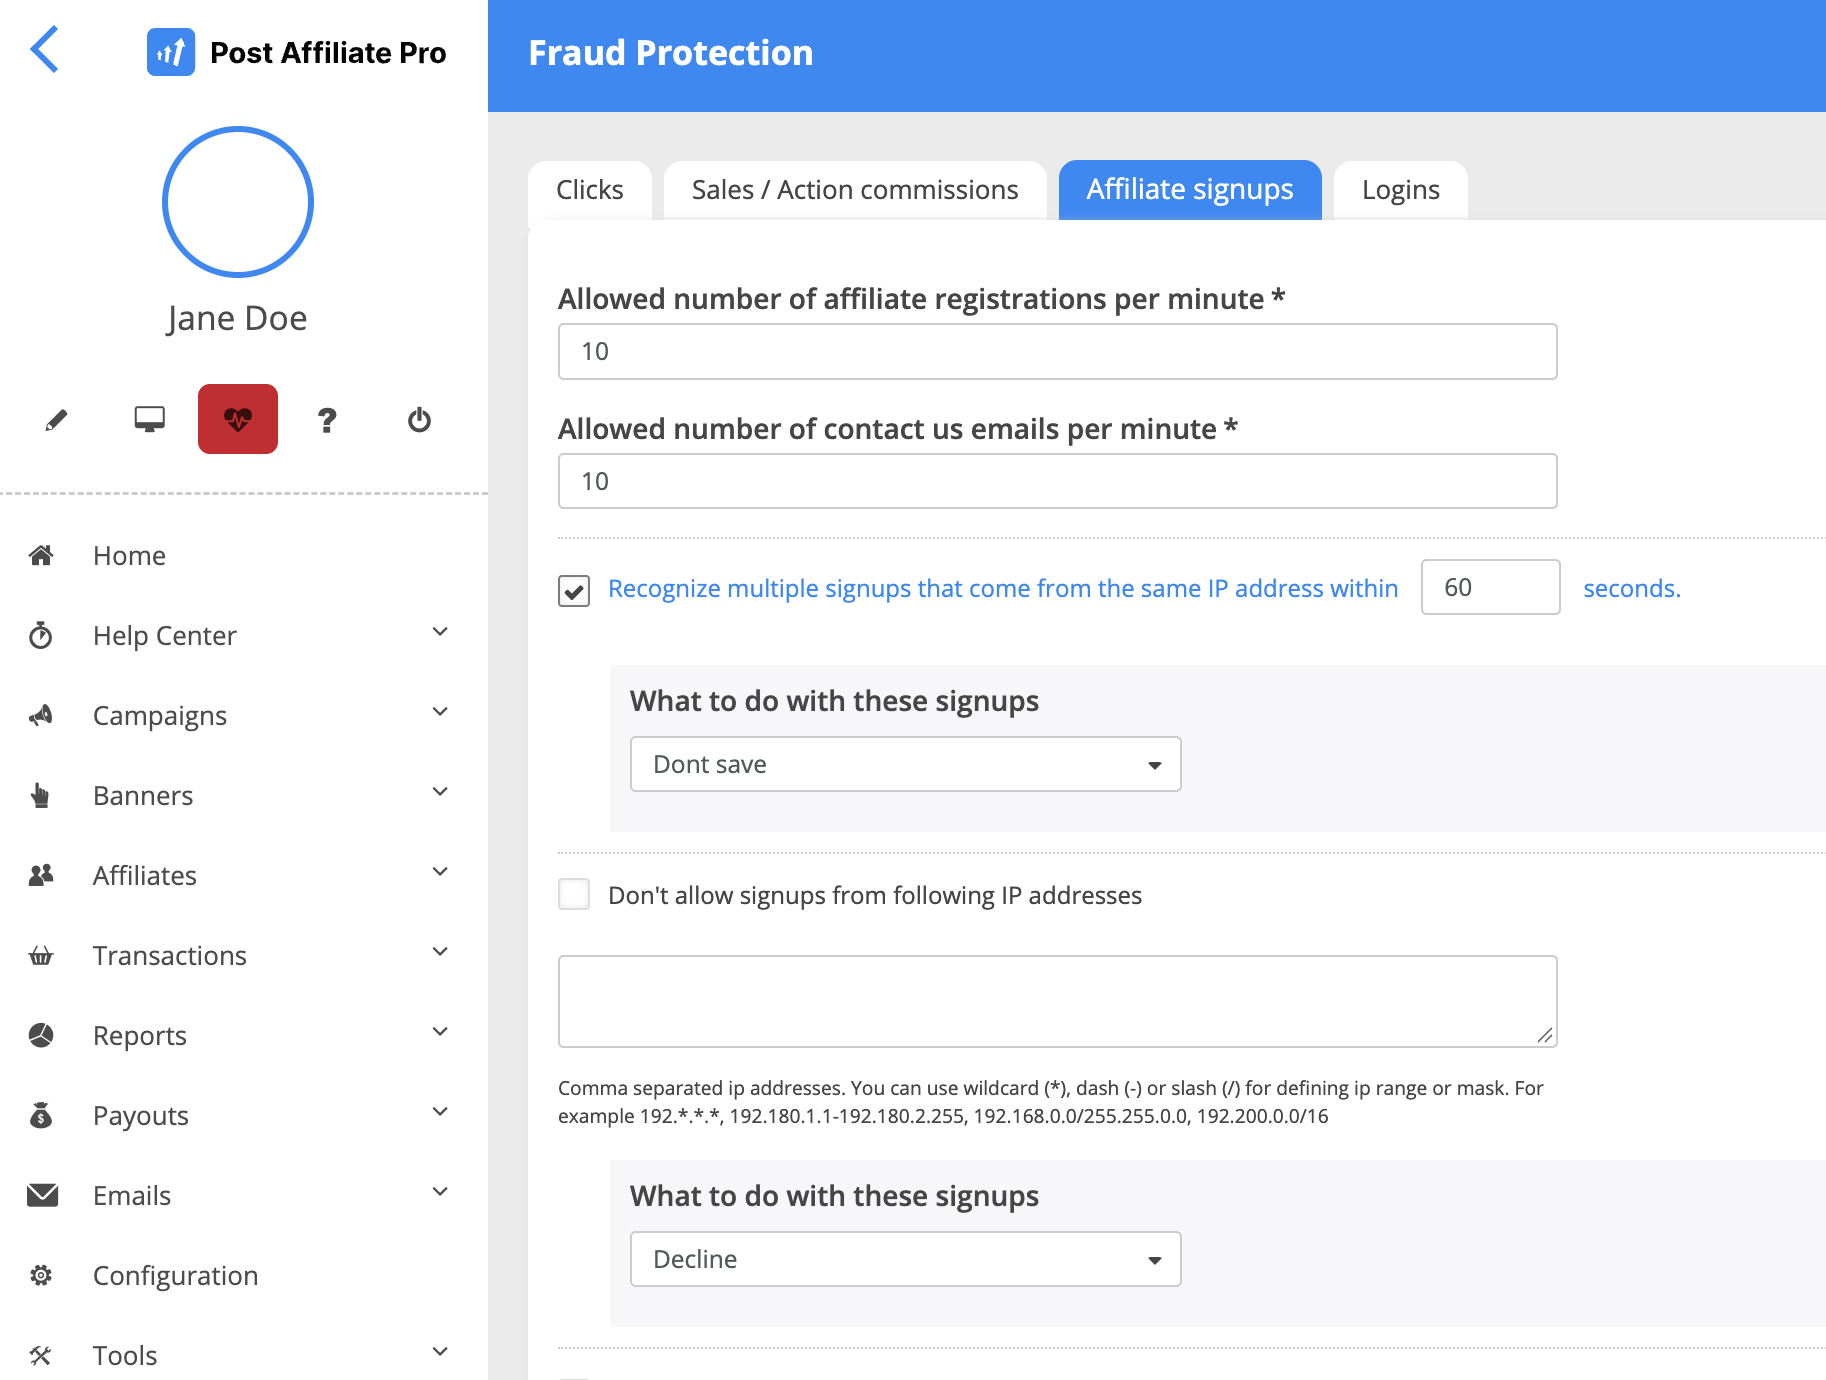
- Tick Recognize multiple signups that come from the same IP address within and enter a number of seconds.
- Under What to do with these signups, choose the action.
- Optional: in Don’t allow signups with following referral ids, enter comma separated keywords.
- Optional: set the limits Allowed number of affiliate registrations per minute and Allowed number of contact us emails per minute.
- Optional: tick Don’t allow signups from following IP addresses and enter the addresses, in the same format as the IP lists above. Choose the action under What to do with these signups.
Tip: the repeated-signup rule is off by default. When you switch it on, the default window is 60 seconds and the default action is Don’t save, so use Decline while you test. Both limits are set to 10 per minute by default. In Don’t allow signups with following referral ids, enter words that you do not want any affiliate to use as a referral ID.
Signup rules work best together with approval. New affiliates can be approved manually, and that is the default setting, so a suspicious account never gets a tracking link until you have looked at it.
Step 5: protect logins
This tab protects the login pages of the merchant panel and of the affiliate panel against password guessing and against logins from places you do not expect. It has two parts: limits for unsuccessful logins and IP lists.
Limit unsuccessful logins
- Open the Logins tab.
- In Allowed number of unsuccessful login attempts in one hour per username, enter how many failed attempts one username may have in an hour.
- In Allowed number of unsuccessful login attempts in one hour per IP, enter how many failed attempts one IP address may have in an hour.
- Save the tab.
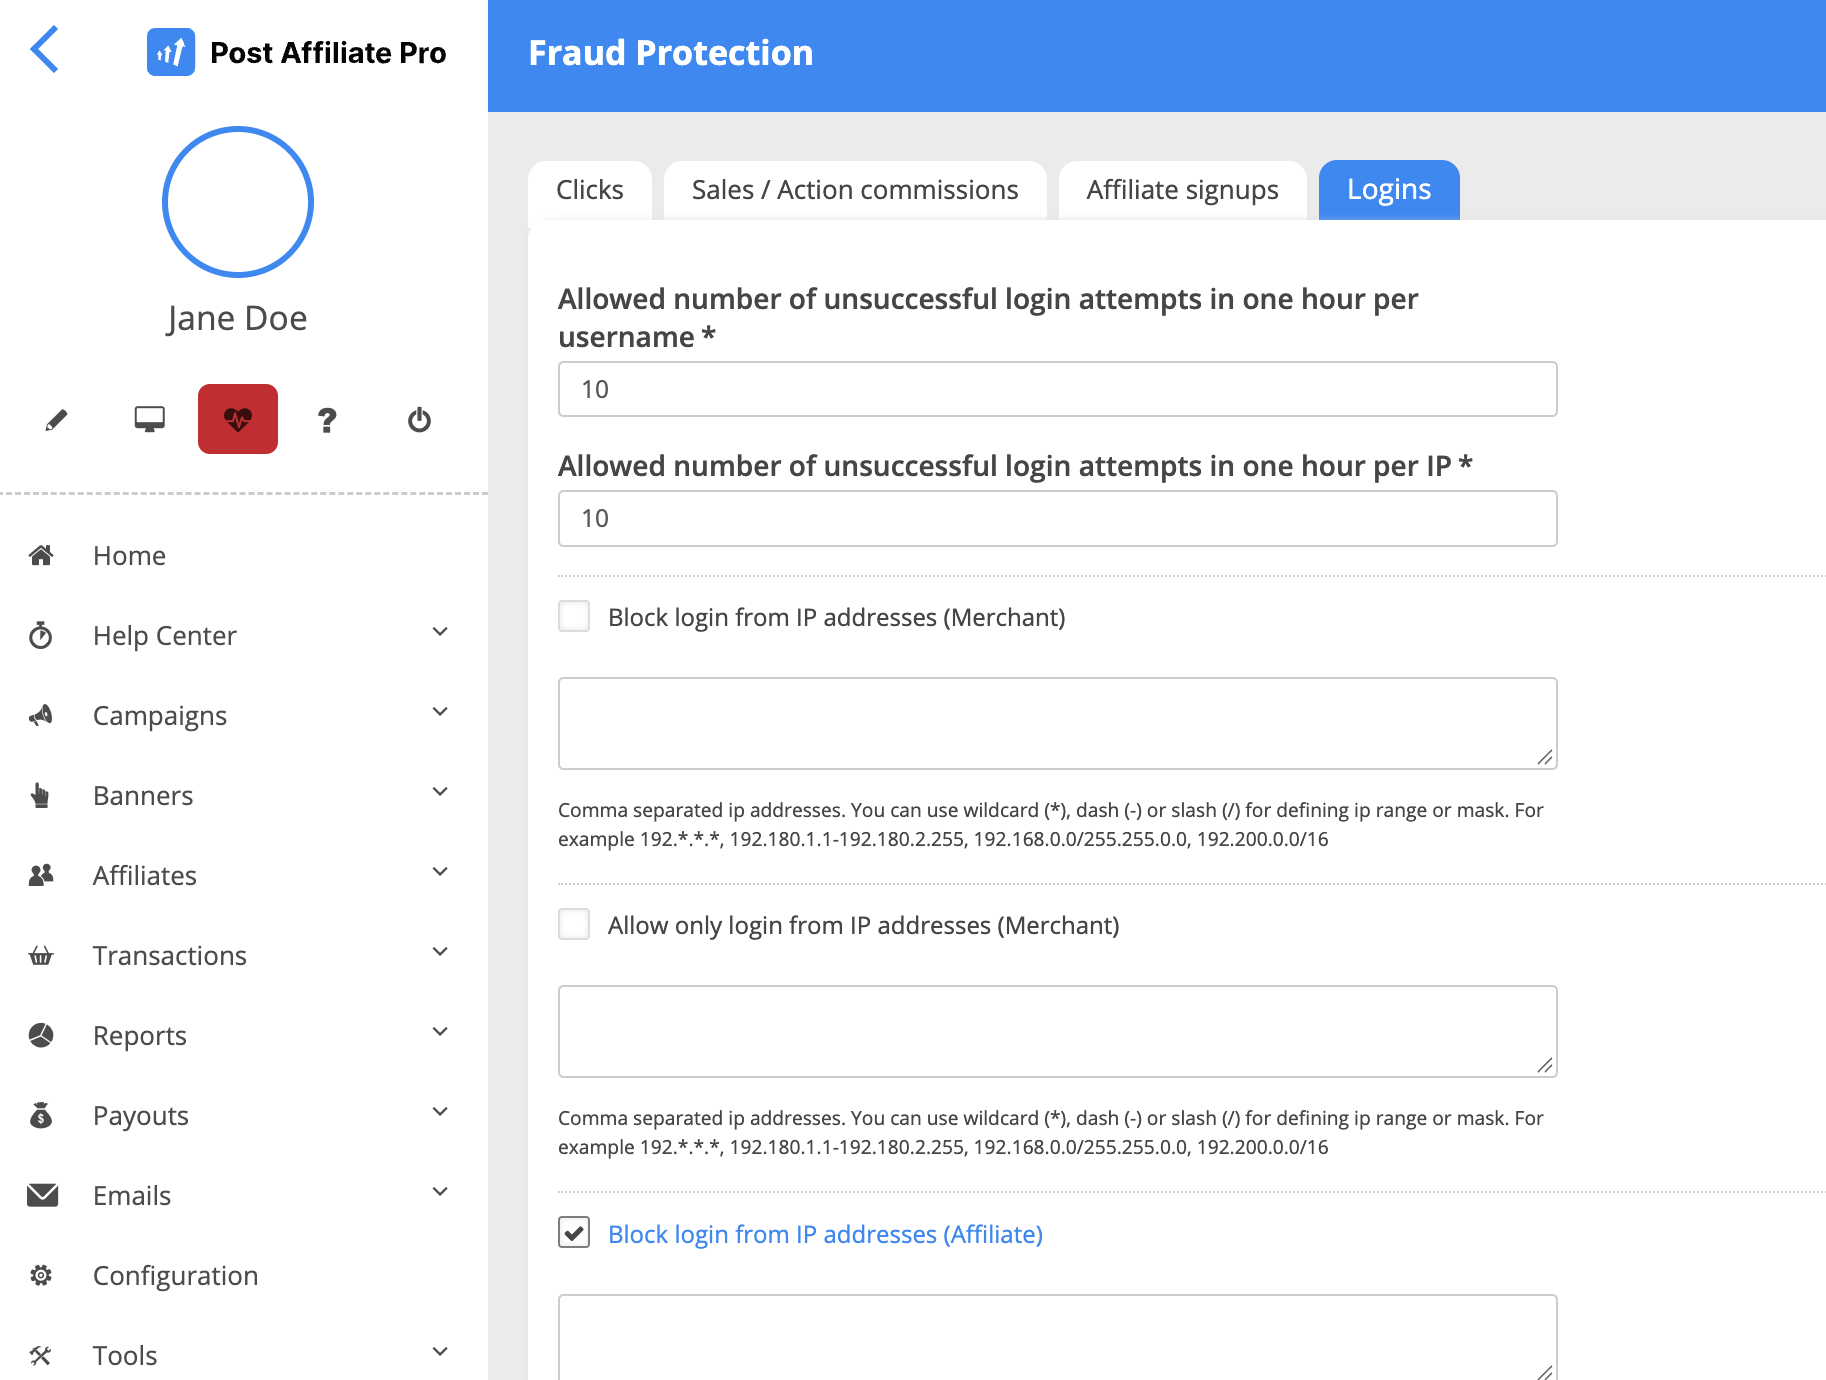
Both fields are required and accept whole numbers from 1. The default is 10 for each. When a limit is reached, further login attempts are refused (the server answers 429 Too Many Requests) and the attempt is written to the log as a brute force attempt.
Tip: there is one pair of limits for the whole system. The same numbers apply to merchant logins and affiliate logins, but they are counted separately for each, so a failed affiliate login does not use up the merchant allowance. You cannot set different numbers for the two groups. A real person rarely fails more than a few times in an hour, so the default of 10 is a reasonable starting point, and you can lower it to 5 if you see repeated guessing in your logs. Do not set it to 1 or 2: a single typo would then lock a real user out.
Restrict logins by IP address
Merchant and affiliate logins have separate lists, marked (Merchant) and (Affiliate) on the screen:
- To block addresses, tick Block login from IP addresses and enter the IP addresses.
- To allow only certain addresses, tick Allow only login from IP addresses and enter the IP addresses.
- Do this for the (Merchant) list, the (Affiliate) list, or both.
- Save the tab.
Tip: which group to restrict. Use an allow-only list for merchants, because your team is small and usually logs in from known addresses. Do not use an allow-only list for affiliates: they log in from anywhere, so everyone not on the list would be locked out. For affiliates, use the block list, and only for addresses that have already caused trouble.
Failed attempts and logins are recorded by affiliate login tracking , where you can review them.
Before you save an allow-only list for merchant logins, check that your own address is on it, or you will lock yourself out.
Step 6: add country blacklists
Country blacklists appear on the tabs when GeoIP is active. The GeoIP page explains how to activate the feature.
- On each tab, find Blacklisted countries.
- Enter two-letter country codes.
- Choose the action:
- What to do with clicks from blacklisted countries
- the same setting for sales
- What to do with affiliates from blacklisted countries
- On the Logins tab, set the country options for merchants and for affiliates.
A country blacklist in your affiliate software is a blunt tool, because it also blocks real customers from those countries. Use it where you have no customers or affiliates. A softer option is to set a 0% commission for a country in the GeoIP commission rules, so the traffic is not blocked but earns nothing.
Tip: start with the countries that appear most in your declined clicks and where you have no customers, add them one at a time, and choose Decline so you can review what was blocked.
Step 7: validate sales with a secret key
The Sale Tracking Fraud Protection plugin checks that each sale really comes from your own checkout.
Activate the plugin
- Go to Configuration > Plugins.
- Activate Sale Tracking Fraud Protection.
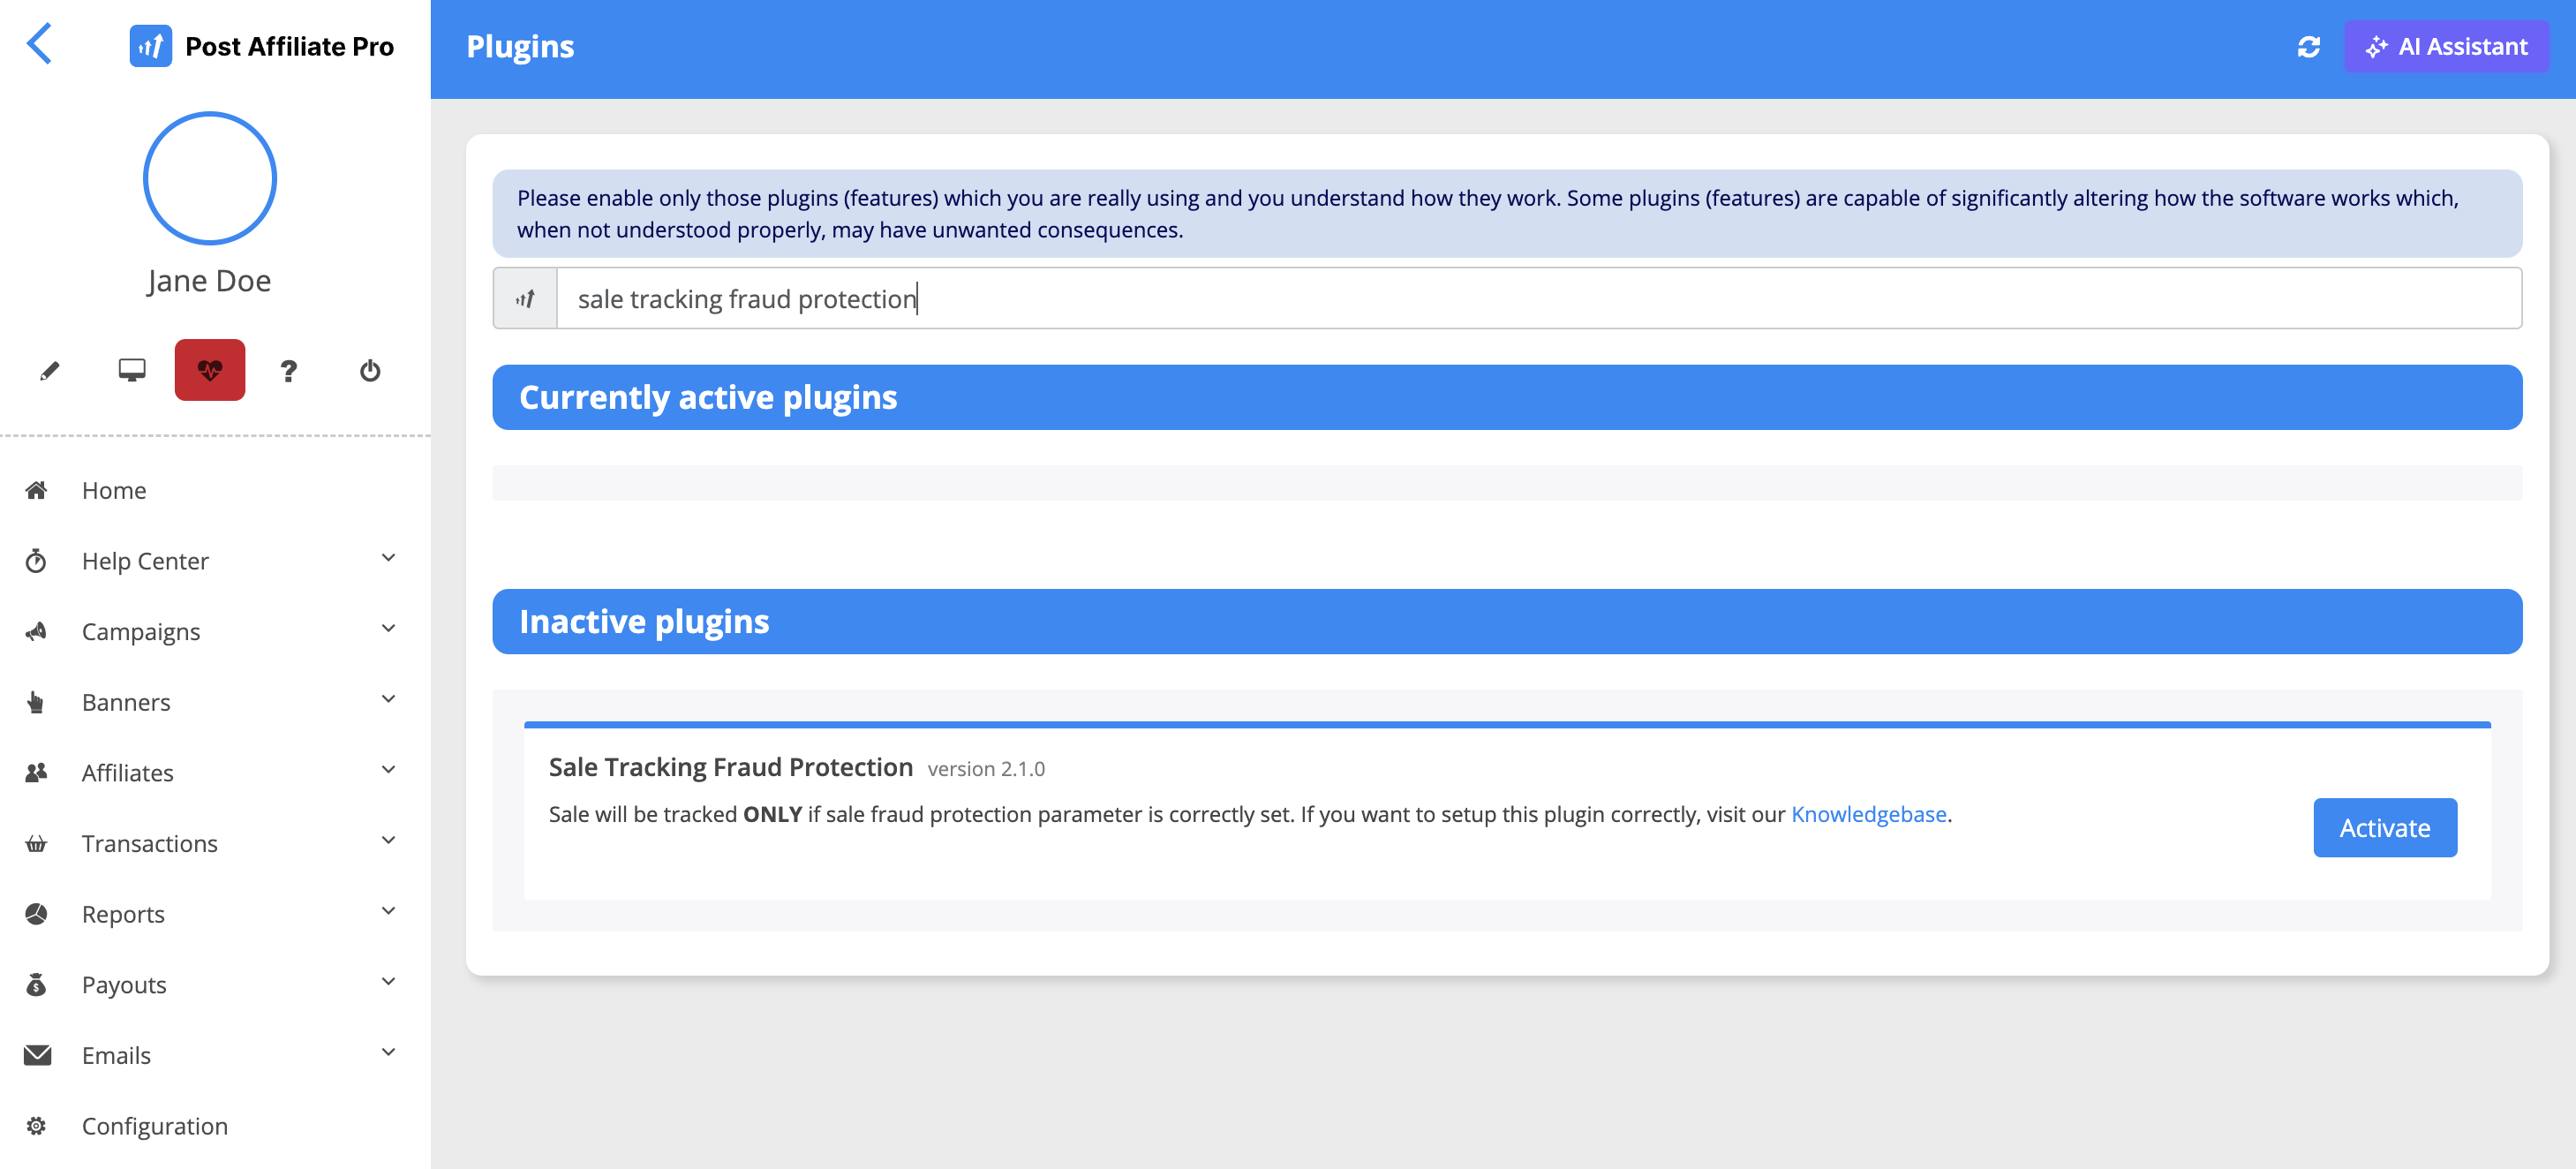
- Open its configuration and set:
- Secret key: the general key used to compute an MD5 checksum.
- Param name: the extra data field, from data1 to data5, in which your tracking code posts the checksum.
Add the checksum to your checkout
Your checkout has to calculate the same checksum: the MD5 of the order total, the order ID and the secret key, joined with commas, so md5(total,orderId,secretKey).
- If the total starts with a decimal point, a leading 0 is added first.
- Use exactly the same total and order ID that your tracking code sends.
- Sales that you create as offline sales in the merchant panel get the checksum added automatically.
Use a different key for one campaign
- Go to Campaigns > Campaigns Manager and open the campaign.
- In the campaign’s details, scroll down to Additional options.
- Fill in Sale Tracking Fraud Protection - Secret key.
- If you leave the field empty, the general key is used.
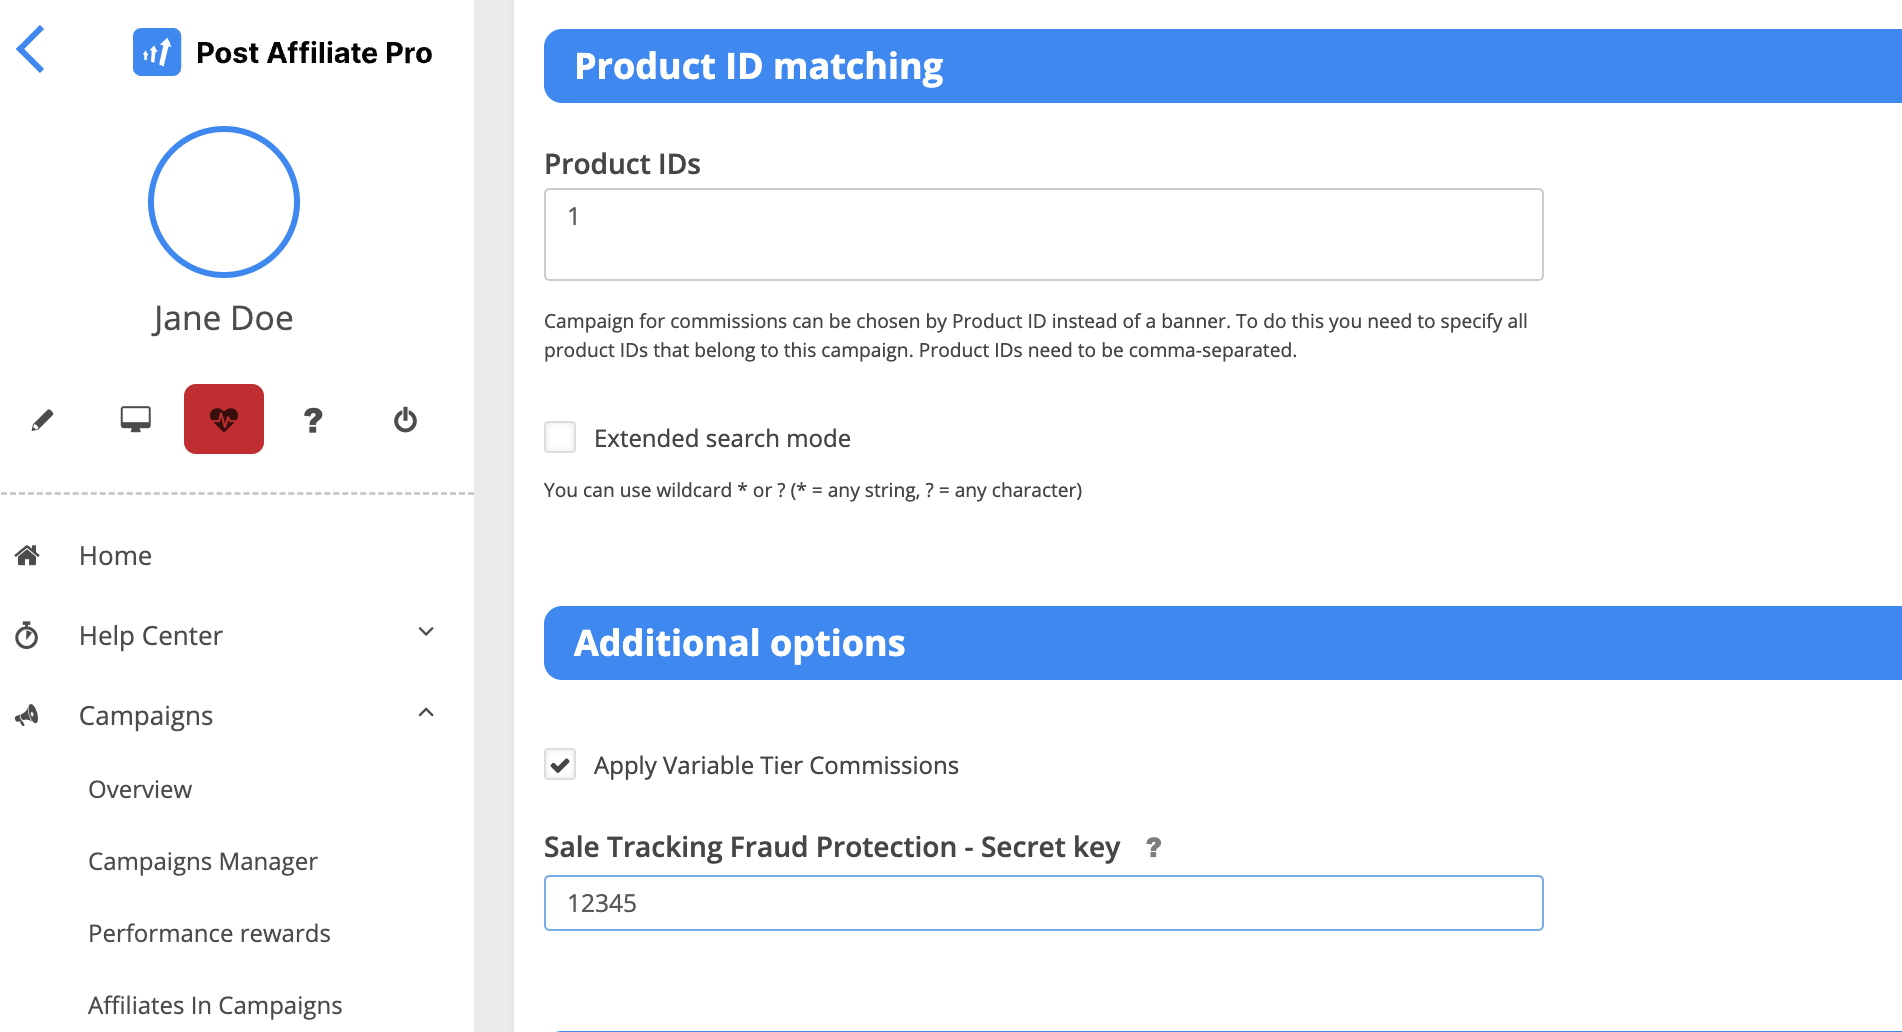
Note: while the plugin is active, a sale is saved only if its checksum matches. Add the checksum to your checkout and test it with one order before you activate the plugin, or genuine sales will not be saved.
Test it
- Activate the plugin, best on a test account or at a quiet time, because genuine sales without a checksum are not saved while it is active.
- Send one test order with a correct checksum. It should be saved as usual.
- Send another test order with a wrong checksum. It should not be saved.
Step 8: approve commissions before they are paid
Even good rules miss things, so keep a human step before money moves.
Manual approval
- Open the campaign’s commission settings.
- Set the Approval field of a commission type to manual.
The advanced commission configuration page covers the options.
Tip: choose manual approval for new affiliates and for large commissions. Once you trust an affiliate, you can switch their commission type back to automatic approval.
Delay with the Auto Approval Commissions plugin
If you prefer a delay to a manual review, use the Auto Approval Commissions plugin.
- Set Auto approve commissions after x days per commission type.
- Optional: in Set status, choose decline instead of approve once the days have passed.
If you decline a commission before the auto approval date, it stays declined. The delay gives you time to check refunds and suspicious activity before a commission is paid.
Tip: set the number of days to at least your refund period. If customers can refund within 30 days, use 30 days, so a refunded order is not approved first.
Step 9: check what the rules caught
A rule you never review will either miss fraud or block real customers. After the first week:
- Open Transactions > Clicks list, set Search in to Declined Clicks (the filter shows Type: Declined). These are the clicks your click rules stopped.
- Open Transactions > Commissions and look at the declined ones, including the messages you added.
- If real customers appear in the list, widen the window or add a limit such as the same campaign.
A simple routine to keep
| Task | Where | How often |
|---|---|---|
| Review declined clicks and sales | Transactions > Clicks list, Transactions > Commissions | Weekly at first, then monthly |
| Review commissions before approval | Transactions > Commissions | Every payout cycle |
| Re-check IP, referrer and country lists | Configuration > Tracking Settings > Fraud Protection | Quarterly |
| Re-test the checksum | Your checkout and the Sale Tracking Fraud Protection plugin | Whenever the checkout code changes |
| Check repeated-click and duplicate-order windows against real traffic | Configuration > Tracking Settings > Fraud Protection | After any change in traffic or checkout |
What these rules cannot do
The Fraud Protection rules work on IP addresses, user agents, referrer URLs, countries and order IDs. They do not analyze the visitor’s device or behavior. A visitor on a residential proxy has an ordinary IP address and an ordinary country, so the IP and country checks will not flag them, which is the reason Step 8 exists. How the same layers work in programs with high payouts is covered in preventing affiliate fraud in high-commission niches . The rules also do not decide who is a fraudster: they decide what happens to the traffic that matches. For the patterns to look for by hand, use the detection guide linked at the top or our FAQ on how to prevent affiliate fraud , and for the improvements Post Affiliate Pro has made to these tools, the fraud protection FAQ .
Next steps
Do three things today. Turn on the duplicate order ID check on the Sales / Action commissions tab, switch on the repeated-click rule with Decline as the action, and set manual approval on the commission type your newest affiliates earn on. Then put a monthly review in your calendar. If you are not using Post Affiliate Pro yet, you can start a free trial and set this up on your own program, or book a demo and we will walk you through it.
Need help finding a setting?
Post Affiliate Pro has a built-in AI Assistant inside the app, available on all plans, including free trials. It can guide you through the merchant panel, so if you cannot find a screen or a setting from these steps, ask it where it is. You can read more on the AI features page .