

PDF Banners
PDF banners in Post Affiliate Pro are customizable, high-quality marketing materials generated from text and HTML, allowing merchants to easily create, modify, ...
2 min read
PDFBanners
AffiliateMarketing
+3

Post Affiliate Pro provides advanced banner management features including SmartLinks for multiple destination URLs with device and country targeting, banner categories for organization, and comprehensive banner rotation settings.
Available in:
Post Affiliate Pro , Post Affiliate Pro Ultimate , Post Affiliate Network
Post Affiliate Pro provides comprehensive banner management capabilities beyond basic banner creation:
These features help you manage complex promotional material libraries, target different audiences effectively, and optimize banner performance.
Set up advanced tracking in minutes. No credit card required.
Post Affiliate Pro supports a variety of banner types to suit different promotional needs:
| Type | Code | Description |
|---|---|---|
| Image Banner | I | Standard image banners (JPG, PNG, GIF) |
| Text Link | T | Simple text-based affiliate links |
| HTML Banner | H | Fully customizable HTML content with forms, tables, and interactivity |
| Flash Banner | F | Legacy Flash-based banners (SWF files) |
| Lightbox Banner | U | Overlay banners that appear on top of page content |
| PDF Banner | V | Downloadable PDF documents with affiliate personalization |
| Promo Email | E | Email templates affiliates can send to their contacts |
| Link | A | Simple URL links without visual elements |
| Banner Rotator | R | Container that rotates multiple banners |
| Use Case | Recommended Type |
|---|---|
| Standard display advertising | Image Banner |
| Search engine friendly links | Text Link |
| Interactive content (forms, menus) | HTML Banner |
| Attention-grabbing popups | Lightbox Banner |
| Offline marketing materials | PDF Banner |
| Email marketing campaigns | Promo Email |
| A/B testing multiple creatives | Banner Rotator |
SmartLinks allow you to configure multiple destination URLs for a single banner, with automatic URL selection based on visitor characteristics.
When a visitor clicks a banner with multiple destinations configured:
SmartLinks automatically use the “Redirect links” tracking method to enable this dynamic URL selection.
Target visitors based on their device:
| Device Type | Description |
|---|---|
| Desktop | Windows, Mac, Linux computers |
| Mobile | Smartphones and mobile devices |
| Tablet | iPad, Android tablets |
Target by operating system:
| OS | Examples |
|---|---|
| iOS | iPhone, iPad |
| Android | Android phones and tablets |
| Windows | Windows desktop and mobile |
| Mac OS | macOS computers |
| Linux | Linux desktops |
Target by visitor location:
Each destination rule includes:
| Setting | Description |
|---|---|
| Destination URL | The target URL for matching visitors |
| Device Types | Which devices this URL applies to |
| Operating Systems | Which OS this URL applies to |
| Country Codes | Which countries this URL applies to |
| Rank | Weight for random selection among matches |
When multiple destinations match a visitor’s criteria, the rank determines selection probability:
| Destination | Rank | Selection Probability |
|---|---|---|
| URL A | 10 | 50% |
| URL B | 6 | 30% |
| URL C | 4 | 20% |
This enables A/B testing of landing pages within the same targeting criteria.
Route mobile users to app store links:
| Destination | Device | OS | URL |
|---|---|---|---|
| iOS App | Mobile | iOS | https://apps.apple.com/app/yourapp |
| Android App | Mobile | Android | https://play.google.com/store/apps/yourapp |
| Desktop | Desktop | (any) | https://yoursite.com/download |
Route visitors to localized content:
| Destination | Country | URL |
|---|---|---|
| US Store | US | https://store.example.com/en-us/ |
| UK Store | GB | https://store.example.com/en-gb/ |
| German Store | DE, AT, CH | https://store.example.com/de/ |
| Default | (empty) | https://store.example.com/ |
| Destination | Device | URL |
|---|---|---|
| Mobile Landing | Mobile, Tablet | https://m.example.com/offer |
| Desktop Landing | Desktop | https://example.com/offer |
Be the first to know about new features and product updates.
Banner Categories provide a hierarchical organization system for your promotional materials.
Categories support unlimited nesting levels:
All Banners
├── Seasonal Promotions
│   ├── Holiday 2026
│   ├── Summer Sale
│   └── Black Friday
├── Product Types
│   ├── Software
│   │   ├── Desktop Apps
│   │   └── Mobile Apps
│   └── Services
├── Banner Sizes
│   ├── Leaderboard (728x90)
│   ├── Medium Rectangle (300x250)
│   └── Skyscraper (160x600)
└── Languages
    ├── English
    ├── German
    └── Spanish
A banner can belong to multiple categories simultaneously.
Configure a default category for new banners:
Categories enable filtering throughout the system:
In the banners list:
Filter reports by banner category:
Affiliates can filter available banners by category, making it easier to find relevant promotional materials when you have many options.
The banners grid can show category assignments:
Banner Rotator is a special banner type that displays different banners each time the page loads.
| Setting | Description |
|---|---|
| Rank | Weight determining display frequency |
| Valid From | Start date for banner inclusion |
| Valid Until | End date for banner removal |
Ranks determine how often each banner appears:
| Banner | Rank | Display Probability |
|---|---|---|
| Summer Sale | 50 | 50% |
| Product A | 30 | 30% |
| Product B | 20 | 20% |
Control when banners appear in rotation:
| Banner | Valid From | Valid Until | Description |
|---|---|---|---|
| Holiday Banner | Dec 1 | Dec 31 | Holiday season only |
| Regular Banner | (empty) | (empty) | Always active |
| Flash Sale | Nov 25 | Nov 25 | Single day |
Banner Rotators track statistics for each included banner:
| Metric | Description |
|---|---|
| All Impressions | Total times the banner was displayed |
| Unique Impressions | Unique visitor impressions |
| Clicks | Number of clicks on the banner |
| CTR | Click-through rate |
Access these in the rotator’s banner list to compare performance.
Test which creative performs best:
Automatically update promotions:
Showcase multiple products:
Lightbox banners display as overlays on top of the page content, capturing visitor attention effectively.
| Setting | Default | Description |
|---|---|---|
| Delay | 500ms | Time before lightbox appears |
| Width | 400px | Lightbox window width |
| Height | 300px | Lightbox window height |
Deep linking allows affiliates to modify banner destination URLs to link to specific pages on your site.
Deep linking works automatically with:
Affiliates modify the banner URL:
Original: https://yoursite.com/
Deep link: https://yoursite.com/product/specific-item
The tracking code preserves affiliate attribution while redirecting to the custom URL.
| Banner Type | Deep Link Support |
|---|---|
| Image Banner | Yes |
| Text Link | Yes |
| HTML Banner | Yes (with variable) |
| Lightbox Banner | Yes |
| Banner Rotator | Per rotated banner |
Post Affiliate Pro provides comprehensive banner performance tracking.
View statistics for each banner:
| Metric | Description |
|---|---|
| Impressions | Times the banner was displayed |
| Unique Impressions | Unique visitor impressions |
| Clicks | Number of banner clicks |
| CTR | Click-through rate |
| Conversions | Sales attributed to banner |
| Commission | Total commission generated |
Detailed banner analysis in Reports section:
Combined campaign and banner analysis:
Compare multiple banners:
Monitor these KPIs for banner optimization:
| KPI | Formula | Good Target |
|---|---|---|
| CTR | Clicks / Impressions | >0.5% |
| Conversion Rate | Conversions / Clicks | >2% |
| EPC | Commission / Clicks | Varies by product |
| EPM | Commission / 1000 Impressions | Varies by product |
Before creating many banners:
Modern traffic is heavily mobile:
Continuously improve performance:
Give affiliates options:
Regular performance review:
Professional promotional materials:
Banner management features integrate with:
Configure multiple destinations per banner, organize banners into categories, and set up intelligent rotation. Take your promotional materials to the next level.
PDF banners in Post Affiliate Pro are customizable, high-quality marketing materials generated from text and HTML, allowing merchants to easily create, modify, ...
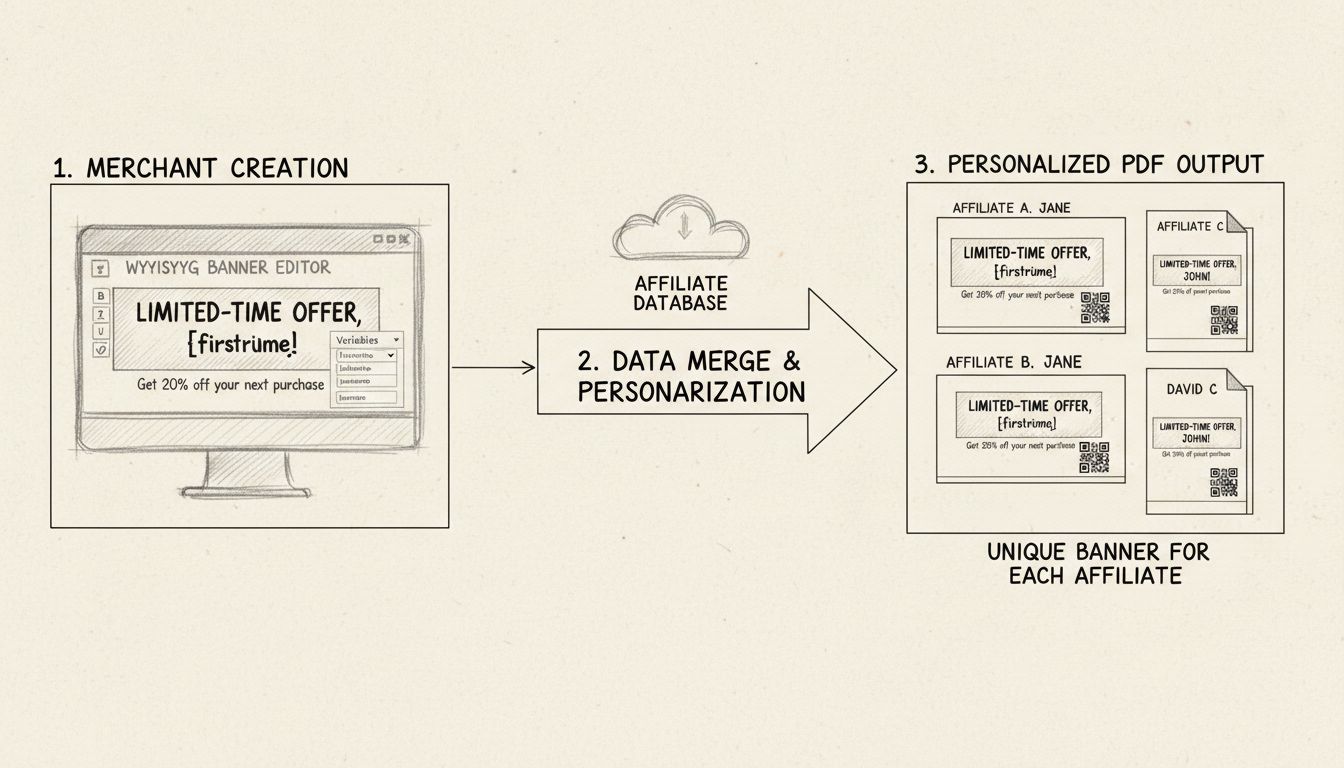
Learn what simple PDF banners are in Post Affiliate Pro. Discover how to create customizable, personalized PDF documents for your affiliate marketing campaigns ...
Post Affiliate Pro supports all types of image banners. Banner ads come in numerous sizes, but are often rectangles 460 by 60 pixels.
Join our community of happy clients and provide excellent customer support with Post Affiliate Pro.

Cookie Consent
We use cookies to enhance your browsing experience and analyze our traffic. See our privacy policy.